A Little History or Why NFS?
File shares on computer networks are as old as the concept of a network itself. The idea of being able to access data across a wire by multiple machines was created not long after the first network was created. When the PC industry took off in the 1980’s file share became commonplace among most businesses, both large and small. The ubiquitous “file server” was a mainstay in most businesses from this time through the 2010s. Even now, the concept still lives on as it evolved to cloud-based storage options that serve much of the same purpose.
During the 1980s and 1990s, several different file sharing protocols emerged for networks from different vendors. There was SMB from Microsoft that shipped as part of Windows for Workgroups and Windows NT, the IPX based NCP from Novell that was hugely popular for business networks, and the NFS protocol that originated from Sun Microsystems. Unlike SMB and NCP however, NFS went on to be released as an open standard and was widely adopted by the UNIX community on systems like BSD and Linux. It remained a rather obscure file-sharing system with the SMB and NCP dominating the market until Novell fell out of favor and Linux rose in popularity as a server-based operating system. Through this rise, it became a staple among networks that used Linux hosts for sharing files. Because of its rise in popularity along with Linux, support for the protocol even among cloud vendors providing storage as a service remains a priority to help maintain backward compatibility with older applications that are being migrated to the cloud.
NFS on Azure
On Azure, there are two primary ways to get NFS as a service. The first one is through Azure NetApp Files, a service that was built with a partnership between NetApp and Microsoft to provide file shares as a service for large data sets. The other implementation is for less performant, but highly scalable workloads on Azure Blob Storage. Before Microsoft added this feature, mounting Blob Storage as part of a file system was only possible through Blobfuse. This approach is still valid for some use cases, but NFS allows for protocol-level access to blob storage, so any NFS client can mount Blob Storage as part of the client’s file system, including Windows, now that it has an NFS client.
To setup NFS on Blob Storage, there are a few things that have to be enabled for the subscription. To enable, you’ll need the Azure CLI installed on your local machine or you can access it through Cloud Shell in the Azure portal. Once Azure CLI is installed and you’ve logged in, run the following two commands. The first enables NFS on Blob Storage, and the second then enables hierarchical namespaces (HNS) which is needed for the NFS service to work.
az feature register --namespace Microsoft.Storage --name AllowNFSV3
az feature register --namespace Microsoft.Storage --name PremiumHns
After running the commands, wait for about 15 minutes. Once these are enabled. You can now set up an NFS share on a Blob Storage account.
In the Azure Portal, create a Storage Account.
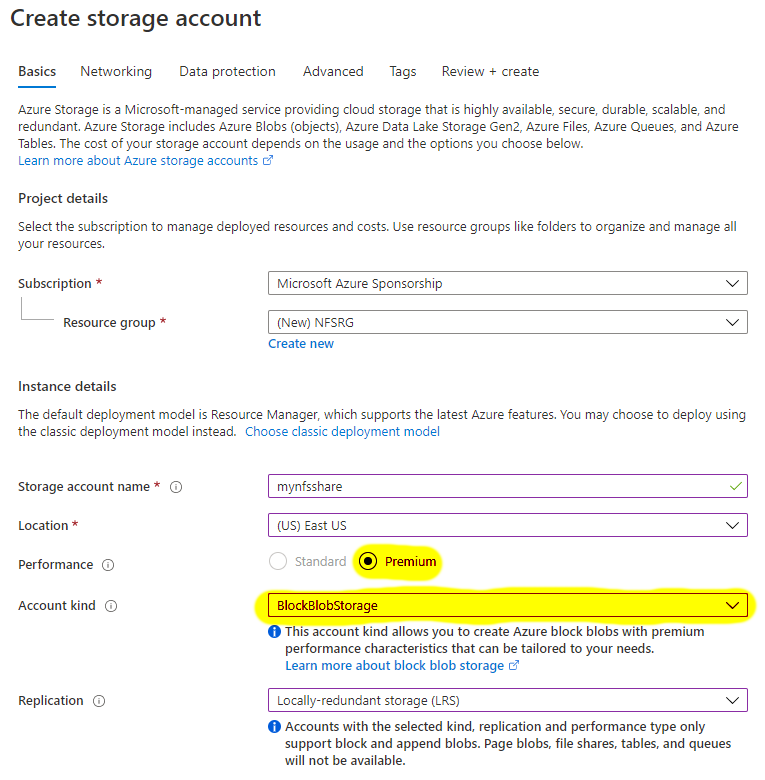
On the Basics blade of the Storage Account, the main settings to watch for are the Performance setting and the Account Kind. These must be set to Premium and BlockBlobStorage respectively.

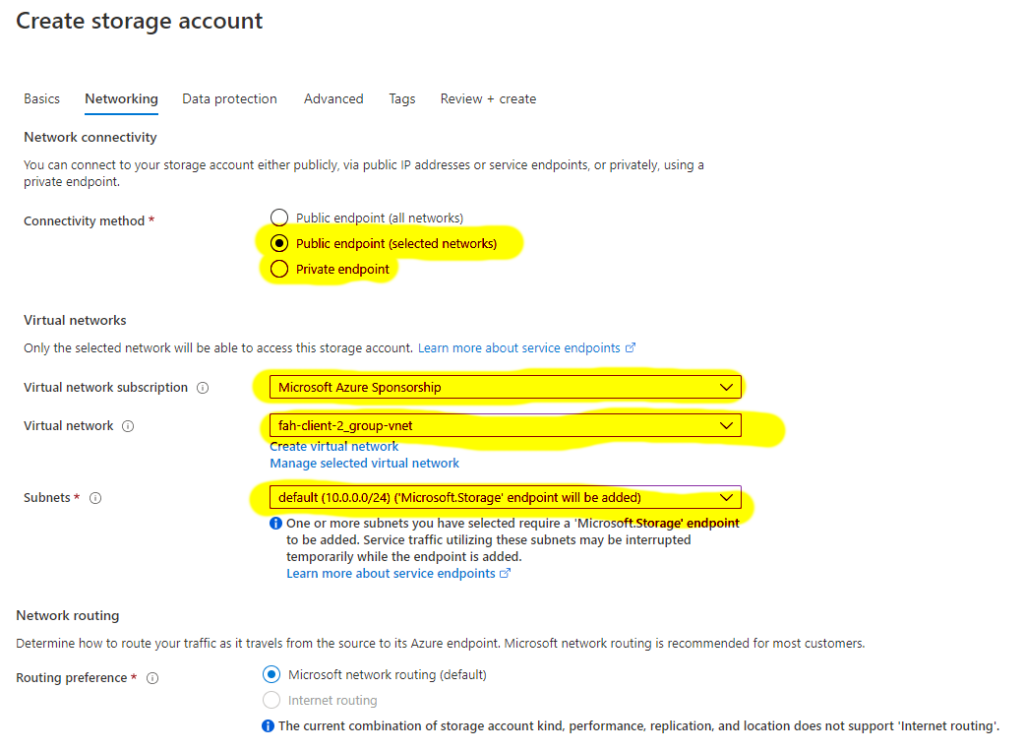
On the Networking blade, make sure that you choose Public endpoint (Selected Networks) or Private endpoint. This is needed for security. You will then need to configure what network you want to use with the Storage Account. Everything else is not enabled.

On Data protection, no items are selectable so leave this blade as is.
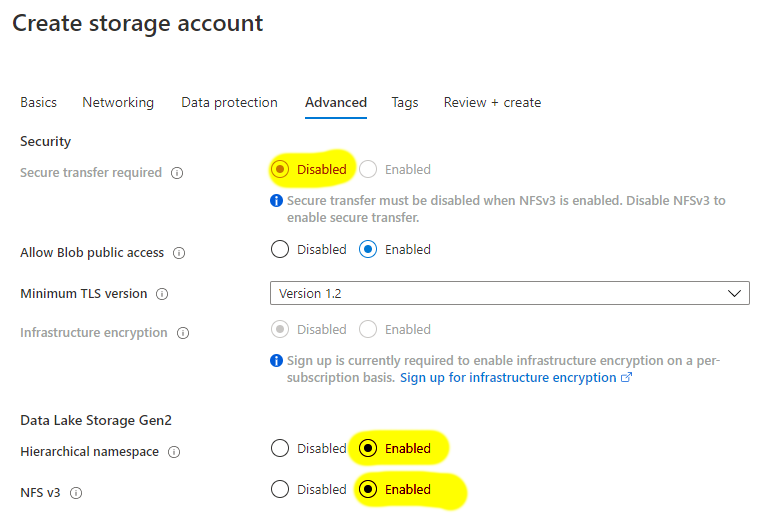
On the Advanced blade, ensure that Secure Transfer required is disabled, Hierarchal namespaces is enabled, and NGS v3 is enabled.

You can add tags if you like on the Tags blade.
On the Review + create blade, click the Create button. This will create the Storage Account.
Once the Storage Account has been completed, open the Storage Account in the Azure Portal and then click on Containers on the Overview blade. Here, click + Container to add a new container. You can name it whatever you want.

Mounting in Windows
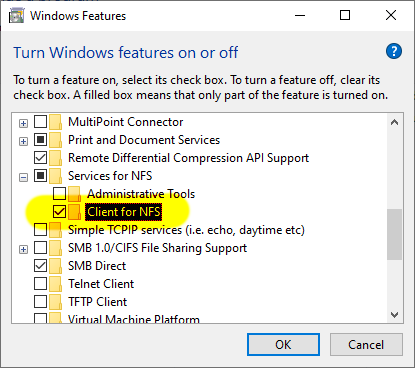
On Windows, the first thing you will need to do is add the Windows Client for NFS. To do this, open Control Panel, navigate to Programs and Features, Click on Turn Windows features on or off, then find the Services for NFS group, expand it, then check the box next to Client for NFS. This will install the client for NFS on Windows.

If you want to enable write access to the NFS share, you need to create two registry settings. You can do this by launching PowerShell and running the following two commands. Once this is done, you need to reboot or restart the NFS service.
New-ItemProperty -Path HKLM:SOFTWAREMicrosoftClientForNFSCurrentVersionDefault -Name AnonymousUid -PropertyType DWord -Value 0

New-ItemProperty -Path HKLM:SOFTWAREMicrosoftClientForNFSCurrentVersionDefault -Name AnonymousGid -PropertyType DWord -Value 0
Now, you can mount the Storage Account. To do this, run the following command in a Command Prompt (CMD).
mount -o nolock STORAGEACCOUNT.blob.core.windows.net:/STORAGEACCOUNT/CONTAINER Q:
Replace STORAGEACCOUNT with the name of your storage account in both places and then replace CONTAINER with the name of the container you created in your storage account. You can replace Q: with whatever drive letter you want or use * to let Windows pick one.
Mounting on Linux
Mounting on Linux is simple, but you’ll need to have an NFS client install first. Some distros have this automatically installed, but others will need to install it.
Once it’s installed, create a mountpoint with mkdir. You may need sudo if you aren’t a root user or don’t have permissions.
mkdir /mnt/mystuff
After creating the mountpoint, mount the Storage Account with the mount command.
mount -o sec=sys,vers=3,nolock,proto=tcp STORAGEACCOUNT.blob.core.windows.net:/STORAGEACCOUNT/CONTAINER /mnt/mystuff
Replace STORAGEACCOUNT with the name of your storage account in both places and then replace CONTAINER with the name of the container you created in your storage account. The last parameter is the mountpoint you created on the file system with mkdir.
When to Use?
Blob Storage as a storage solution offers a low-cost option for storing data in the cloud. However, the storage does come with some limitations and caveats. Using NFS on Blob Storage will work for many workloads that don’t require demanding IOPS (input/output operations per second). For more demanding workloads, consider using Azure Files or Azure NetApp files for better performance.
Conclusion
NFS on Blob Storage is still a preview feature, but once it does GA, it has many use cases that will help older applications take advantage of the cost savings of Blob Storage and without the headaches of maintaining a file server.
