Continuing from the previous post, SonarQube expects a certain set of files to be present in $(Common.TestResultsDirectory). When it doesn’t find the files in the folder, it can prevent it from reporting the results correctly. Because of changes to the vstest task, that folder is cleaned up once the tests results are uploaded, meaning that the files may not exist when SonarQube looks for them. We have a few options for resolving this issue.
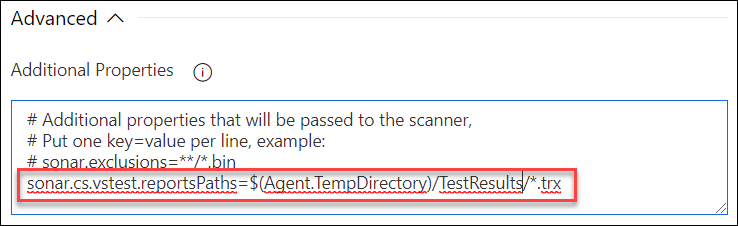
The easiest approach is to modify the Prepare Analysis on SonarQube task, adding sonar.cs.vstest.reportsPaths to Additional Properties (in Advanced settings) and pointing it to the new location, $(Agent.TempDirectory)/TestResults. This has a problem, however. The folder is cleaned after each test run. As a result, only the most recent tests would be available. The workaround for that problem is simple. After the test completes, copy the files to another location. Unfortunately, all of these approaches have the problem: they rely on an implementation detail that could change in the future.
Gathering The Results
There is another approach. It is a bit more complex, but it eliminates the need to rely on an implementation detail and provides guarantees on the access to the test data. Azure DevOps provides REST APIs for retrieving the results of any Test Runs executed in a build. The runs contain attachments representing the test results and code coverage. We can utilize these APIS to download the complete set of test runs to a known location (such as Common.TestResultsDirectory) and allow SonarQube to discover the files in that directory.
The process looks something like this:
- Find the Test Runs associated with the current build using this API.
- For each Run, get the list of attachments using this API
- Download the attachments and save them to a local folder
- Organize the attachments for analysis by SonarQube
The attachments themselves will usually consist of the test results file (TRX) and the related coverage documents, all of which are stored with the run. The files are stored as binaries which can be individually downloaded.
The TRX file is an XML document which details the results. That document includes the folder structure that it expects for those files. Because the folder structure is lost during this process, the code will need to either modify the TRX to point to the files or we need to recreate the folder structure for the files. This ensurse that all of the files can be located by SonarQube. SonarQube expects to see the files stored in the structure specified in the TRX file (either at the same level as the TRX or in a subdirectory named “In” which exists in a folder with the same name as the TRX file).
Task Pre-Requisites
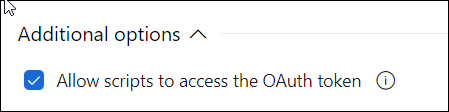
In order to use these APIs from inside our build process in a custom PowerShell script in the Build Pipelines UI, we need to ensure that the Allow scripts to access the OAuth token is enabled at the job level. This allows the scripts in that job to access a special environment variable, SYSTEM_ACCESSTOKEN, which we can use for communicating with the APIs.
If we’re using the YAML builds, we need to approach this differently: we expose the variable System.AccessToken as an environment variable to the tasks that require it:
- task: Powershell@2
  displayName: 'PowerShell Script'
  inputs: ...
  env:
    SYSTEM_ACCESSTOKEN: $(System.AccessToken)
In this case, we are creating an environment variable called SYSTEM_ACCESSTOKEN from the system variable,System.AccessToken.
In order to utilize the APIs, we need a few more system variables for the API calls. The complete list is here, but we really only care about these three:
| System Variable | Environment Variable | Usage |
|---|---|---|
| Build.BuildUri | BUILD_BUILDURI | The URI representing the current build |
| System.TeamFoundationServerUri | SYSTEM_TEAMFOUNDATIONSERVERURI | The URI of the Azure DevOps organization |
| System.TeamProject | SYSTEM_TEAMPROJECT | The name of the current project |
With all of these values, it’s now possible to develop a script. You just need to wrapper up the API calls, coordinate processing the results, add some error handling, and throw in some retry logic to ensure it can recover from any intermittent issues.
Thankfully, this is not an exercise for the reader.
The Final Script
I’ve published a PowerShell module called AzDOTestResults to the PowerShell Gallery and to Github. The PowerShell module is also signed, thanks to DigiCert. They provided me with a code-signing certificate as a Microsoft MVP (and during the process, impressed me with an easy-to-use portal and some of the most incredible customer support staff I’ve ever seen!)
To quickly get started with the module, just add a PowerShell script task with the following inline script:
Install-Module AzDOTestResults -Scope CurrentUser -Force -AllowClobber
Import-Module AzDOTestResults
Copy-TestResultToTemp
If you use the YAML-based builds:
steps:
- powershell: |
   Install-Module AzDOTestResults -Scope CurrentUser -Force -AllowClobber
   Import-Module AzDOTestResults
   Copy-TestResultToTemp
  displayName: 'Download Test Results'
This will ensure the complete set of test results is located in $(Agent.TempDirectory)/TestResults and that they are organized in a way that aligns with SonarQube. You can use the Copy-TestResultToCommon task to store the files in Common.TestResultsDirectory, but be aware that you need to wait a few seconds to ensure it is finished deleting files. Or you can use Copy-TestResult -OutputFolder path-to-files to specify your own location. The documentation provides a few other options as well.
Happy DevOp’ing!