This post continues a series that provides a walkthrough illustrating how to work with Azure Active Directory B2C custom policies by building one from the ground up. As the series progresses, the topics will serve to show how the different parts of the AAD B2C policy syntax and the underlying framework can be brought together to realize desired functionality. At the conclusion of the series, you should be ready to both understand existing AAD B2C policies and to create new ones for yourself.
The topic areas being covered in this series are:
| Topic | Focus Area |
|---|---|
| Introduction | |
| Hello World! | Returning a simple message with a custom policy |
| Hello [Your Name Here]! | Custom policy elements and syntax, how to collect and work with user input |
| Hello! (But Only If You Have an Access Code) | How to perform input validation |
| Hello! (NOW WITH REST!) | How to make REST calls to external services for validation or information exchange |
| Hello! Let’s Add a User | How to use the backing Azure Active Directory database to store and retrieve user information |
| Hello! Please Either Sign In or Sign Up <– You are here | How to either sign in an existing user or allow a new user to sign up |
| Hello! It’s Time To Clean Up a Bit | How to use multiple files and a policy file hierarchy to manage and reuse policy content |
NOTE
This walkthrough is intended for developers who want to learn how to leverage AAD B2C Custom Policies. The content assumes you understand basic AAD B2C concepts such as how to make use of the built-in policies to implement basic user management and authentication tasks. Basic functional tutorials for AAD B2C can be found in the online documentation here.
Catching Up
In the previous posts in this series we have seen how to use Azure AD B2C custom policies to collect information from a user, validate/verify that information, how to use that information to create and/or update user account records with built-in and custom fields in Azure Active Directory, and how to return some of that information as claims in a JWT token. What we have not done yet is to actually use that information to authenticate the user. Put another way, we know how to sign up, we still need to learn how to sign-in.
In this post we will continue building upon our “Hello World” policy. We will update the policy to the provided Azure AD B2C user interface content to present the user with an option to either sign-in with an existing account or to sign-up as they have been doing with a new account.
We will continue working with the example policy that we have developed throughout the previous posts in this series. You can download a copy of that file here. Be sure to update the TenantId, PolicyId, and PublicPolicyUri attributes to the correct values from your AAD B2C tenant, update the YOUR_API_URL entries, and (if you used different names) replace your own cryptographic key names in the JWTIssuer TechnicalProfile element. Finally, you will also need to replace the OBJECT_ID and APPLICATION(CLIENT)_ID values in the Azure AD Technical Profile Metadata sections to match the corresponding values from the B2C Extensions App as was described previously in this series.
In addition to the policy file, the Visual Studio ASP.NET Core Web solution that was used to create and deploy the Web API that was introduced in the previous post is also available for download. You can download a copy of that project here.
If you had any problems following along or if you ran into a problem that you could not quite solve, instructions for how to obtain a completed policy are provided in the Pre-Build Policy File and Resources section at the end of this post.
Verifying Credentials with OpenID Connect
Let’s discuss sign-in first. The key to signing-in to a user account with Azure AD B2C is to make a request to an endpoint that allows you to verify the credentials for that account. There are many ways we can verify user account credentials, but the most common approach – and what we will be discussing here – is to confirm the combination of a user-provided username and password.
NOTE:
Another option beyond just confirming username and password combinations is to involve Multi-Factor Authentication (MFA). As its name suggests, MFA is an approach to authentication where multiple factors are involved in making the determination of authenticity. The most common interpretation is to combine the requirement that the user provide something they know and something they have (or something they are.) Something they know would include a username/password combination. Something they have would be a cell-phone to receive a text message or perhaps an authentication application installed on a registered device that can be used to return a code with an agreed-upon algorithm. Something they are refers to biometric information like a thumbprint. Requiring that a user provide two of these instead of just one greatly decreases the possibility of an account being compromised due to credential leaks. MFA strategies can be implemented with either built-in or custom policies in Azure AD B2C, but doing so is beyond the scope of this particular post.
Once you have collected the credential values from the user, your B2C policy will need to verify them. You could achieve this in a few ways:
- Hardcode credential combinations in the policy and use a Claims Transformation Technical Profile to verify them, similar to what we initially did with the “individual account” passcodes earlier in this series. (Don’t do this – it is mentioned only anecdotally. Hardcoding credentials is a bad idea.)
- Send the credentials to an HTTP endpoint and have them verified there, again similar to what we did later on with the “individual account” passcodes earlier in this series. This is less risky than hardcoding, but you’re still possibly sending sensitive information around. If you’re doing username/password verification, there’s a better solution.
- Call a security endpoint based on a published authentication protocol and let that endpoint make a determination about the validity of those credentials.
In this post, we’re going with what’s behind door #3. Recall from the previous post in this series:
When you create an instance of the Azure AD B2C service in your Azure subscription, what you actually get is a new Azure Active Directory tenant that is pre-loaded with some default infrastructure, as well as some infrastructure that is specific to Azure AD B2C itself. This infrastructure content includes some elements that we’ve already seen. For example:
- Support for creating and updating Application Registrations.
- Service endpoints for standards-compliant Identity Provider implementations like OpenID Connect and OAuth2.
- Identity Experience Framework services like the IEF runtime, and a repository for storing and accessing policy definitions.
We are particularly interested in the fact that the underlying Azure AD tenant supports standards-compliant Identity Provider implementations like OpenID Connect and OAuth2 (among others). We can leverage this to verify our username/password combination – effectively federating to ourselves. But before we can do so, some additional setup is required.
NOTE:
Azure AD B2C supports federating authentication to many different authentication providers using both built-in and custom policies. Steps for how to do so are provided in the online documentation for OpenID Connect, OAuth1, and OAuth2 providers like Amazon, Azure AD, Google, LinkedIn, Twitter, and Microsoft (outlook.com and similar) accounts, as well as for working with SAML providers like ADFS and Salesforce. However, with these approaches to Federated authentication, you are handing the responsibility of credentials gathering to the federated provider, rather than asking the endpoint to validate the credentials we’ve already gathered.
OpenID Connect Setup
To set up the Azure AD tenant to receive OpenID Connect requests from our Azure AD B2C service, we need to register a pair of applications with the Azure AD tenant. Just like registering applications that will call our Azure AD B2C policy endpoints, This registration will yield clientID and resource identifier values what will need to be included in calls to the Azure AD OpenID Connect endpoint requests.
Rather than repeat the instructions for registering these applications here, I would instead refer you to the Register Identity Experience Framework applications steps published in the Azure AD B2C documentation. Follow those steps, remembering to record the two application ID values – and which value goes to which application – as you go through the step.
Add the OpenID Connect Technical Profile
Now, open your policy file and add the following claims declarations to the Claims Schema section of the policy:
<ClaimType Id="grant_type">
  <DisplayName>grant_type</DisplayName>
  <DataType>string</DataType>
  <UserHelpText>Special parameter passed for local account authentication to login.microsoftonline.com.</UserHelpText>
</ClaimType>

<ClaimType Id="scope">
  <DisplayName>scope</DisplayName>
  <DataType>string</DataType>
  <UserHelpText>Special parameter passed for local account authentication to login.microsoftonline.com.</UserHelpText>
</ClaimType>

<ClaimType Id="nca">
  <DisplayName>nca</DisplayName>
  <DataType>string</DataType>
  <UserHelpText>Special parameter passed for local account authentication to login.microsoftonline.com.</UserHelpText>
</ClaimType>

<ClaimType Id="client_id">
  <DisplayName>client_id</DisplayName>
  <DataType>string</DataType>
  <AdminHelpText>Special parameter passed to EvoSTS.</AdminHelpText>
  <UserHelpText>Special parameter passed to EvoSTS.</UserHelpText>
</ClaimType>

<ClaimType Id="resource_id">
  <DisplayName>resource_id</DisplayName>
  <DataType>string</DataType>
  <AdminHelpText>Special parameter passed to EvoSTS.</AdminHelpText>
  <UserHelpText>Special parameter passed to EvoSTS.</UserHelpText>
</ClaimType>
These claims are used to provide values for the credential verification request to the Azure AD OpenID Connect endpoint.
With the necessary claims now in place, add the following Claims Provider to the Claims Providers section of your policy. Substitute the Application ID that you gathered for the ProxyIdentityExperienceFrameworkApp for the two PROXY_ID_APPID values and the Application ID that you gathered for the IdentityExperienceFrameworkApp for the two ID_APPID values.
<ClaimsProvider>
  <DisplayName>OpenID Connect Technical Profiles</DisplayName>
  <TechnicalProfiles>
    <TechnicalProfile Id="LoginUser">
      <DisplayName>Local Account SignIn</DisplayName>
      <Protocol Name="OpenIdConnect" />
      <Metadata>
        <Item Key="UserMessageIfClaimsPrincipalDoesNotExist">We can't seem to find your account</Item>
        <Item Key="UserMessageIfInvalidPassword">Your password is incorrect</Item>
        <Item Key="UserMessageIfOldPasswordUsed">Looks like you used an old password</Item>

        <Item Key="ProviderName">https://sts.windows.net/</Item>
        <Item Key="METADATA">https://login.microsoftonline.com/{tenant}/.well-known/openid-configuration</Item>
        <Item Key="authorization_endpoint">https://login.microsoftonline.com/{tenant}/oauth2/token</Item>
        <Item Key="response_types">id_token</Item>
        <Item Key="response_mode">query</Item>
        <Item Key="scope">email openid</Item>

        <!-- Policy Engine Clients -->
        <Item Key="UsePolicyInRedirectUri">false</Item>
        <Item Key="HttpBinding">POST</Item>

        <Item Key="client_id">PROXY_ID_APPID</Item>
        <Item Key="IdTokenAudience">ID_APPID</Item>

      </Metadata>
      <InputClaims>
        <InputClaim ClaimTypeReferenceId="email" PartnerClaimType="username" Required="true" />
        <InputClaim ClaimTypeReferenceId="password" PartnerClaimType="password" Required="true" />

        <InputClaim ClaimTypeReferenceId="grant_type" DefaultValue="password" />
        <InputClaim ClaimTypeReferenceId="scope" DefaultValue="openid" />
        <InputClaim ClaimTypeReferenceId="nca" PartnerClaimType="nca" DefaultValue="1" />

        <InputClaim ClaimTypeReferenceId="client_id" DefaultValue="PROXY_ID_APPID" />
        <InputClaim ClaimTypeReferenceId="resource_id" PartnerClaimType="resource" DefaultValue="ID_APPID" />

      </InputClaims>
      <OutputClaims>
        <OutputClaim ClaimTypeReferenceId="objectId" PartnerClaimType="oid" />
      </OutputClaims>
    </TechnicalProfile>
  </TechnicalProfiles>
</ClaimsProvider>
This OpenID Connect invocation results in a credential validation because it is making a Resource Owner Password Credentials (RPOC) grant request, which rather than tasking an Identity Provider with gathering a user’s account credentials, instead has the client gather those credentials and present them to the Identity Provider itself. The Identity Provider then validates the credentials and either returns a token or an error. This kind of call is made by specifying a grant_type value of password in an access token request to the Identity Provider, and then including the username and password values.
Although generally discouraged, in this case using the ROPC flow is acceptable. Per the OAuth 2.0 specification, “[t]he resource owner password credentials grant type is suitable in cases where the resource owner has a trust relationship with the client, such as the device operating system or a highly privileged application.”
The values specified configure the OpenID Connect ROPC request to use the Azure AD metadata and authorization token endpoints. The special entry {tenant} is used to tell the Identity Experience Framework to substitute the current Tenant ID into the URLs.
Since the request is made with a scope value of openid, if the token request is successful (if the credentials are valid), the request will include an ID Token being returned to the Identity Experience Framework. The values in this ID Token can then be returned from the Open ID Connect request as claims fro the policy, as is the case with the objectId value included in the Output Claims section, above. We will see shortly how this objectId claim value can be used to retrieve the specific claims that we want to return as the result of our policy’s execution.
Configuring Sign-up/Sign-in
We are going to make some changes to our policy in order to allow the user to select whether to sign-in or sign-up when they encounter our Azure AD B2C policy. This is going to include a refactoring of the Technical Profile that currently assembles both the displayName and message claims, the introduction of a new user input Technical Profile and related Content Definition type, and a bit of a rearrangement of our Orchestration Steps. Along the way, we will be removing the “Update User” functionality we currently have in place, as we won’t be changing user settings during sign-in. In practice, that would normally be handled with a task-specific “Edit Profile” policy that a user could invoke once they had successfully signed in to an application that wanted to offer that kind of functionality.
Refactoring the UserInputMessageClaimGenerator Technical Profile
Locate the existing UserInputMessageClaimGenerator Technical Profile in your policy and replace it with the following two Technical Profile declarations:
<TechnicalProfile Id="UserInputMessageClaimGenerator">
  <!--
  Generates the content of the message claim by applying the relevant claims transformation
  -->
  <DisplayName>Usser Input Message Claim Generator Technical Profile</DisplayName>
  <Protocol Name="Proprietary" Handler="Web.TPEngine.Providers.ClaimsTransformationProtocolProvider, Web.TPEngine, Version=1.0.0.0, Culture=neutral, PublicKeyToken=null" />
  <OutputClaims>
    <OutputClaim ClaimTypeReferenceId="message"/>
  </OutputClaims>
  <OutputClaimsTransformations>
    <OutputClaimsTransformation ReferenceId="CreateMessageTransformation"/>
  </OutputClaimsTransformations>
</TechnicalProfile>

<TechnicalProfile Id="UserInputDisplayNameGenerator">
  <DisplayName>Display Name Claim Generator Technical Profile</DisplayName>
  <Protocol Name="Proprietary" Handler="Web.TPEngine.Providers.ClaimsTransformationProtocolProvider, Web.TPEngine, Version=1.0.0.0, Culture=neutral, PublicKeyToken=null" />
  <OutputClaims>
    <OutputClaim ClaimTypeReferenceId="displayName"/>
  </OutputClaims>
  <OutputClaimsTransformations>
    <OutputClaimsTransformation ReferenceId="CreateDisplayNameTransformation"/>
  </OutputClaimsTransformations>
</TechnicalProfile>
Instead of having a single Technical Profile that is responsible for both assembling the user account’s displayName claim and also the greeting message that the policy returns, we are now splitting that responsibility across two separate Technical Profiles. This is because once we sign in a user, we are interested in using the displayName value that has been stored for that user rather than computing it. But we still need to compute the greeting message, regardless of whether the user has signed up or signed in.
Adding the Sign-In/Sign-Up User Interface Technical Profile
Add the following Technical Profile declaration after the LoginUser Technical Profile that you previously declared:
<TechnicalProfile Id="UserSignInCollector">
  <DisplayName>Local Account Signin</DisplayName>
  <Protocol Name="Proprietary" Handler="Web.TPEngine.Providers.SelfAssertedAttributeProvider, Web.TPEngine, Version=1.0.0.0, Culture=neutral, PublicKeyToken=null" />
  <Metadata>
    <Item Key="setting.operatingMode">Email</Item>
    <Item Key="SignUpTarget">SignUpWithLogonEmailExchange</Item>
  </Metadata>
  <OutputClaims>
    <OutputClaim ClaimTypeReferenceId="email" Required="true" />
    <OutputClaim ClaimTypeReferenceId="password" Required="true" />
    <OutputClaim ClaimTypeReferenceId="objectId" />
  </OutputClaims>
  <ValidationTechnicalProfiles>
    <ValidationTechnicalProfile ReferenceId="LoginUser" />
  </ValidationTechnicalProfiles>
</TechnicalProfile>
Recall that a Self-Asserted Technical Profile is used to display user interface elements. This declaration configures the operatingMode of the Technical Profile to be set to collect the user’s email address as their sign-in name. It also provides a SignUpTarget value of SignUpWithLogonEmailExchange. This particular Technical Profile is going to be configured with a Content Definition type that will show a “Sign-Up” link in the user interface. When the user clicks on that link, the value in the Sign Up Target item will be used to locate a ClaimsExchange entry in the policy’s Orchestration Steps, which will in turn point to the Technical Profile that is used to show the Sign-Up user interface.
The Technical Profile defines three Output Claims – email, password, and objectId. The email and password values are used primarily to provide the values collected from the user interface to the LoginUser Validation Technical Profile that is invoked when the user clicks Continue. The objectId claim is returned from the LoginUser Validation Technical Profile if the provided credentials are valid.
Notice that this Self-Asserted Technical Profile lacks a ContentDefinitionReferenceId element in its Metadata. We will see where that definition is provided in a second.
Adding the Sign-In/Sign-Up Content Definition
Recall that the discussion about Content Definitions in the Your Name Here post earlier in this series included a description of the available Data URI’s that could be specified. One of the URI values was unifiedssp, which can be used to display a local account sign-in page as well as an option to click on a sign-up link. We will create a new content definition that references this Data URI for use with our new Self-Asserted Technical Profile.
Add the following Content Definition element to the ContentDefinitions collection in the Building Blocks section of the policy:
<ContentDefinition Id="SignupOrSigninContentDefinition">
  <LoadUri>~/tenant/default/unified.cshtml</LoadUri>
  <RecoveryUri>~/common/default_page_error.html</RecoveryUri>
  <DataUri>urn:com:microsoft:aad:b2c:elements:contract:unifiedssp:2.0.0</DataUri>
  <Metadata>
    <Item Key="DisplayName">Signin and Signup</Item>
  </Metadata>
</ContentDefinition>
Updating the AADUserReader Technical Profile’s Output Claims
The Azure AD User Reader Technical Profile is going to have some additional responsibilities in our User Journey’s Orchestration Steps. In particular, once a user has signed in, we will need to retrieve the user attributes for their user account that they used to type in, since they won’t be prompted to type those in anymore.
Locate the AADUserReader Technical Profile and replace its Output Claims collection with the following:
<OutputClaims>
  <OutputClaim ClaimTypeReferenceId="objectId"/>
  <OutputClaim ClaimTypeReferenceId="userPrincipalName"/>
  <OutputClaim ClaimTypeReferenceId="givenName"/>
  <OutputClaim ClaimTypeReferenceId="surname"/>
  <OutputClaim ClaimTypeReferenceId="displayName"/>

  <OutputClaim ClaimTypeReferenceId="accountType" PartnerClaimType="extension_accountType"/>
</OutputClaims>
Because the Technical Profile is now reading a custom claim, it too needs to include the ApplicationObjectId and ClientId values in its Metadata that were included in the AADUserWriter and AADUserUpdater Technical Profiles.
Locate the ApplicationObjectId and ClientId values from the AADUserWriter Technical Profile and copy them into the AADUserReader Technical Profile’s Metadata section:
<Item Key="ApplicationObjectId">APPLICATION(CLIENT)_ID</Item>
<Item Key="ClientId">APPLICATION(CLIENT)_ID</Item>
Updating (Replacing) the User Journey Orchestration Steps
As previously mentioned, we are going to overhaul our User Journey a bit. Locate the OrchestrationSteps element in the policy and replace it and all of its content with the following:
<OrchestrationSteps>

  <!-- Present a sign-in page, with option to click sign up -->
  <OrchestrationStep Order="1" Type="CombinedSignInAndSignUp" ContentDefinitionReferenceId="SignupOrSigninContentDefinition">
    <ClaimsProviderSelections>
      <ClaimsProviderSelection ValidationClaimsExchangeId="LocalAccountSigninEmailExchange" />
    </ClaimsProviderSelections>
    <ClaimsExchanges>
      <ClaimsExchange Id="LocalAccountSigninEmailExchange" TechnicalProfileReferenceId="UserSignInCollector" />
    </ClaimsExchanges>
  </OrchestrationStep>
</OrchestrationSteps>
This Orchestration Step introduces a new Orchestration Step Type called CombinedSignInAndSignUp. Notice that for a CombinedSignInAndSignUp Orchestration Step, we also need to provide a ContentDefinitionReferenceId attribute which points to the Content Definition we just declared. This is why our Self Asserted Technical Profile earlier did not need its own ContentDefinitionReferenceId entry in its Metadata.
The Orchestration Step then includes a ClaimsProviderSelections element. This element contains a list of the available Claims Exchange entries that list federated Identity Provider options that the user can select if the policy supports federated identities from external Identity Providers, as well as one additional entry that can indicate the claims exchange to use for local account sign-in. At this point in this series, we are only considering local accounts and will not be discussing federating from external IdPs. The local account entry is specified with a ValidationClaimsExchangedId value that references a ClaimsExchange defined in the current Orchestration Step. This Claims Exchange, in turn, references the Self-Asserted Technical Profile that is used to collect and validate the user’s sign-in information.
Now add the following Orchestration Step:
<!-- If the user is signing up (objectId does not exist), collect their information -->
<OrchestrationStep Order="2" Type="ClaimsExchange">
  <Preconditions>
    <Precondition Type="ClaimsExist" ExecuteActionsIf="true">
      <Value>objectId</Value>
      <Action>SkipThisOrchestrationStep</Action>
    </Precondition>
  </Preconditions>
  <ClaimsExchanges>
    <ClaimsExchange Id="SignUpWithLogonEmailExchange" TechnicalProfileReferenceId="UserInformationCollector" />
  </ClaimsExchanges>
</OrchestrationStep>
There are two important things to be aware of with this Orchestration Step. First, it indicates a Precondition that amounts to “if the objectId claim has a value, skip this step.” Recall that the UserSignInCollector Technical Profile returns an objectId value if the user’s credentials are successfully validated by the LoginUser Validation Technical Profile. So if the user has signed-in, this step will be skipped.
Additionally, the Id attribute of the Claims Exchange for this Orchestration Step is set to SignUpWithLogonEmailExchange. That is the ID that was specified in the SignUpTarget Metadata element in the UserSignInCollector Technical Profile. So if the user clicks Sign-Up in the initial UI, that action will get mapped through this Claims Exchange declaration to the UserInformationCollector Self-Asserted Technical Profile instead.
Now that we’ve gotten through the initial Sign-In or Sign-Up part of the Orchestration Steps, let’s consider the remaining (revised) steps in our User Journey. Add the following Orchestration Steps:
<!-- If the user is signing up (objectId does not exist) and it is not a company account, collect and verify an access code -->
<OrchestrationStep Order="3" Type="ClaimsExchange">
  <Preconditions>
    <Precondition Type="ClaimsExist" ExecuteActionsIf="true">
      <Value>objectId</Value>
      <Action>SkipThisOrchestrationStep</Action>
    </Precondition>
    <Precondition Type="ClaimEquals" ExecuteActionsIf="true">
      <Value>accountType</Value>
      <Value>company</Value>
      <Action>SkipThisOrchestrationStep</Action>
    </Precondition>
  </Preconditions>
  <ClaimsExchanges>
    <ClaimsExchange Id="GetAccessCodeClaimsExchange" TechnicalProfileReferenceId="AccessCodeInputCollector" />
  </ClaimsExchanges>
</OrchestrationStep>

<!-- If the user is signing up (objectId does not exist) use the user's provided given name and surname to assemble their Display Name -->
<OrchestrationStep Order="4" Type="ClaimsExchange">
  <Preconditions>
    <Precondition Type="ClaimsExist" ExecuteActionsIf="true">
      <Value>objectId</Value>
      <Action>SkipThisOrchestrationStep</Action>
    </Precondition>
  </Preconditions>
  <ClaimsExchanges>
    <ClaimsExchange Id="GenerateDisplayNameExchange" TechnicalProfileReferenceId="UserInputDisplayNameGenerator"/>
  </ClaimsExchanges>
</OrchestrationStep>

<!-- If the user is signing up (object Id does not exist), write their information to AAD -->
<OrchestrationStep Order="5" Type="ClaimsExchange">
  <Preconditions>
    <Precondition Type="ClaimsExist" ExecuteActionsIf="true">
      <Value>objectId</Value>
      <Action>SkipThisOrchestrationStep</Action>
    </Precondition>
  </Preconditions>
  <ClaimsExchanges>
    <ClaimsExchange Id="AADUserWriterExchange" TechnicalProfileReferenceId="AADUserWriter"/>
  </ClaimsExchanges>
</OrchestrationStep>

<!-- Read the user's information from AAD -->
<OrchestrationStep Order="6" Type="ClaimsExchange">
  <ClaimsExchanges>
    <ClaimsExchange Id="AADUserReaderExchange" TechnicalProfileReferenceId="AADUserReader"/>
  </ClaimsExchanges>
</OrchestrationStep>

<!-- Generate the greeting message -->
<OrchestrationStep Order="7" Type="ClaimsExchange">
  <ClaimsExchanges>
    <ClaimsExchange Id="GetMessageClaimsExchange" TechnicalProfileReferenceId="UserInputMessageClaimGenerator"/>
  </ClaimsExchanges>
</OrchestrationStep>

<!-- Return the claims in a JWT token -->
<OrchestrationStep Order="8" Type="SendClaims" CpimIssuerTechnicalProfileReferenceId="JwtIssuer" />
Orchestration Steps 3 through 5 are only executed if the objectId claim has not been set – if the user is signing-up instead of signing-in. Step 3 also checks to see what kind of accountType the user has selected. As before, if they chose company, the step is skipped; if they chose individual, Step 3 is invoked and the user is asked to enter an Access Code.
Step 4 calls our new UserInputDisplayNameGenerator Technical Profile which assembles a displayName claim for the user from their givenName and surname entries.
Step 5 invokes the AADUserWriter Technical Profile, which writes the newly sign-up user to the Azure AD database. This will generate a new objectId for the user.
Step 6 then reads the user information back from the Azure AD database. In the case of a newly signed-up user, this is a bit redundant. However, for a sign-in user, all we have retrieved so far is their objectId. We use this Read call to obtain the information for the user that we want to use in the remainder of the policy, including the claims to be returned in the JWT token.
Step 7 invokes the UserInputMessageClaimGenerator Technical Profile, assembling the user’s greeting message from their displayName.
Finally, Step 8 assembles and returns the JWT token at the end of the policy’s execution.
Clean Up the Policy’s Output Claims
The final step is to do a little bit of housekeeping on the set of Output Claims being returned by the policy. We had a few claims in there that were used to demonstrate concepts presented earlier in this series which we are going to remove.
Replace the OutputClaims element in the policy’s Relying Party section with the following:
<OutputClaims>
  <OutputClaim ClaimTypeReferenceId="objectId" PartnerClaimType="sub" />

  <OutputClaim ClaimTypeReferenceId="email"/>
  <OutputClaim ClaimTypeReferenceId="displayName" />
  <OutputClaim ClaimTypeReferenceId="givenName" />
  <OutputClaim ClaimTypeReferenceId="surname" />
  <OutputClaim ClaimTypeReferenceId="accountType"/>

  <OutputClaim ClaimTypeReferenceId="message" />
</OutputClaims>
Now upload the updated policy and run it. When you see the new initial Sign-In user interface, enter the email address and password for one of the accounts that you created in the previous post in this series and click Sign-in. You use should now be signed in and you should see the user’s claims as retrieved from Azure AD.
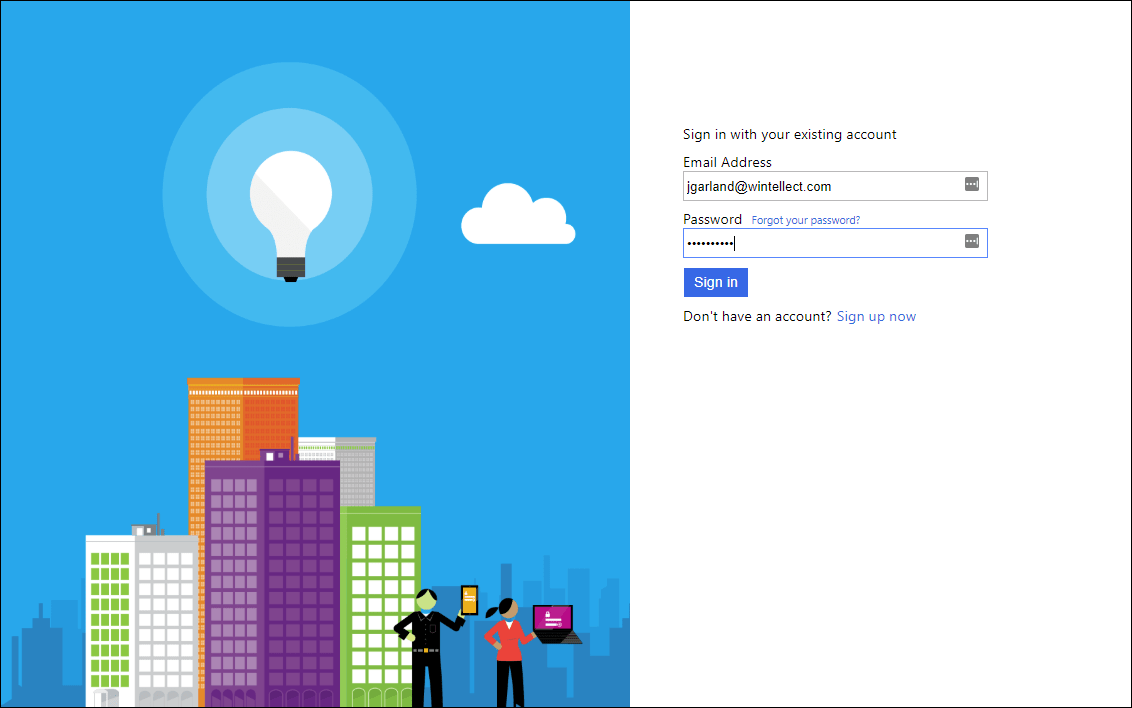
Signing in a user account
Re-run the policy, and instead of signing-in, click the Sign up now link. You should now see the familiar user information collection user interface that we have been working on up to this point. Complete the sign-up process, and notice that you will receive a similar set of claims to the ones that were returned from sign-in (although the order of the individual claims entries may have changed.)
Prebuilt Policy File and Resources
If you had any problems following along or if you ran into a problem that you could not quite solve, a completed version of the policy that was developed in this post is available for download. You can download a copy of that file here. Be sure to update the TenantId, PolicyId, and PublicPolicyUri attributes to the correct values from your AAD B2C tenant, update the YOUR_API_URL entries, and (if you used different names) replace your own cryptographic key names in the JWTIssuer TechnicalProfile element. Finally, you will also need to replace the OBJECT_ID and APPLICATION(CLIENT)_ID values in the Azure AD Technical Profile Metadata sections to match the corresponding values from the B2C Extensions App as is described above.
In addition to the policy file, the Visual Studio ASP.NET Core Web solution that was used to create and deploy the Web API that was introduced in the previous post is also available for download. You can download a copy of that project here.
Recap
In this post we showed how you could use an OpenID Connect Technical Profile to validate username/password account credentials entered by a user to authenticate them. You also saw how you could present end-users with a Sign-In or Sign-Up interface via a CombinedSignInAndSignUp orchestration step and related Technical Profile and Content Definition declarations. And we overhauled the sequence of our Orchestration Steps a bit to work with the Sign-In or Sign-Up approach.
We started with a blank file and created the simplest-possible do-nothing custom policy. From there we’ve added the ability to return a greeting, to customize that greeting via user data input, to validate input locally and with external HTTP calls, to add and update user information for user accounts in Azure AD, and how to authenticate user credentials. At this point, we have built up fairly complete real-world User Journey.
There are some additional technical concepts that merit discussion, but first we should really clean things up a bit.
At close to 1000 lines of XML, however, our policy file has gotten a bit bloated and unwieldy. We have a few places where we’ve duplicated data, and we’d be duplicating even more information if we wanted to create additional custom policies for User Profile Editing or Password Reset. Perhaps there’s a way to simplify things a bit, remove redundancies, and make our policy a little easier to work with.
In the next post in this series we will show you how you can combine multiple policy files to form a policy file hierarchy. We will see how we can “inherit” and “override” values from base policy files. And now that we understand the basic “grammar” of Azure AD B2C custom policies, we will also go back and look at the Starter Pack policies and see how you can use them in your policy file creation.