This post continues a series that provides a walkthrough illustrating how to work with Azure Active Directory B2C custom policies by building one from the ground up. As the series progresses, the topics will serve to show how the different parts of the AAD B2C policy syntax and the underlying framework can be brought together to realize desired functionality. At the conclusion of the series, you should be ready to both understand existing AAD B2C policies and to create new ones for yourself.
The topic areas being covered in this series are:
| Topic | Focus Area |
|---|---|
| Introduction | |
| Hello World! | Returning a simple message with a custom policy |
| Hello [Your Name Here]! | Custom policy elements and syntax, how to collect and work with user input |
| Hello! (But Only If You Have an Access Code) | How to perform input validation |
| Hello! (NOW WITH REST!) | How to make REST calls to external services for validation or information exchange |
| Hello! Let’s Add a User <– You are here | How to use the backing Azure Active Directory database to store and retrieve user information |
| Hello! Please Either Sign In or Sign Up | How to either sign in an existing user or allow a new user to sign up |
| Hello! It’s Time To Clean Up a Bit | How to use multiple files and a policy file hierarchy to manage and reuse policy content |
NOTE
This walkthrough is intended for developers who want to learn how to leverage AAD B2C Custom Policies. The content assumes you understand basic AAD B2C concepts such as how to make use of the built-in policies to implement basic user management and authentication tasks. Basic functional tutorials for AAD B2C can be found in the online documentation here.
Catching Up
In the previous posts in this series you have seen how you could assemble an Azure AD B2C custom policy that could collect, restrict, and validate user input using both inline code and by making calls to HTTP endpoints. Ultimately, running the policy returns a JWT token that contains some of the data that was entered by the user as well as some data that was computed based on the user’s entries. So far, however, everything has been transient. Once you stopped running the policy, the data was lost.
When you create an instance of the Azure AD B2C service in your Azure subscription, what you actually get is a new Azure Active Directory tenant that is pre-loaded with some default infrastructure, as well as some infrastructure that is specific to Azure AD B2C itself. This infrastructure content includes some elements that we’ve already seen. For example:
- Support for creating and updating Application Registrations.
- Service endpoints for standards-compliant Identity Provider implementations like OpenID Connect and OAuth2.
- Identity Experience Framework services like the IEF runtime, and a repository for storing and accessing policy definitions.
Two additional infrastructure areas which we will be introducing in this post include:
- Support for storing and retrieving information about user accounts in the directory.
- The ability to store and retrieve claims about a user account above and beyond the set that the IEF includes y default – these are called Custom Claims.
In this post we will once again extend our “Hello World” policy. We will update the policy to use most of the data that has been input to create a user account entry in Azure AD. From there, we will extend the policy’s storage logic to check to see if Azure AD already contains a user account with the provided email address. If the user account exists, the data that has been entered will be used to update the existing account, otherwise a new account will be created. Finally, we will configure a Custom Claim so that we can store the Account Type value with the user account record.
NOTE:
It is important to keep in mind that while there are many uses for claims in a policy, not every claim that is declared in a policy needs to be persisted in Azure AD. Some claims, like our “Hello World” message, are computed and returned in tokens, but are not really stored anywhere. Other claims are “working” claims – they are neither stored nor returned, but are just used to help with processing, logic, and/or computing other claims. We saw examples of these when working on validation, where sometimes claims were there to help guide which paths in he user journey were executed. As we discussed in the previous post in this series, some claims are used to exchange information with HTTP endpoints (which in turn may store the values somewhere or retrieve them from some kind of storage). And finally, yes – some claims will be stored into and retrieved from Azure AD. If we once again thinking about a policy as a “program” whose job is to authenticate a user and create a token, when you write a desktop program, some variables support the work the program is doing, some variables support the display of information to the screen, and some variables get saved to and retrieved from database/disk/etc.
We will continue working with the example policy that we have developed throughout the previous posts in this series. You can download a copy of that file here. Be sure to update the TenantId, PolicyId, and PublicPolicyUri attributes to the correct values from your AAD B2C tenant, update the YOUR_API_URL entries, and (if you used different names) replace your own cryptographic key names in the JWTIssuer TechnicalProfile element.
In addition to the policy file, the Visual Studio ASP.NET Core Web solution that was used to create and deploy the Web API that was introduced in the previous post is also available for download. You can download a copy of that project here.
If you had any problems following along or if you ran into a problem that you could not quite solve, instructions for how to obtain a completed policy are provided in the Pre-Build Policy File and Resources section at the end of this post.
User Storage in Azure AD B2C
Your Azure AD B2C tenant supports storing and retrieving user accounts and user account information between your policies and the data storage provided by Azure AD, which I will refer to as the Azure AD database. There are several ways that your policies can work with the Azure AD database, including the use of a Technical Profile that is provided specifically for doing so – the Azure Active Directory Technical Profile.
Operations
The Azure Active Directory Technical Profile (AKA AAD Technical Profile) supports four core operations:
| Operation | Purpose |
|---|---|
| Read | Reads information about a user account. |
| Write | Writes information about a user account. This operation can be used to create a new user account or to update an existing user account. |
| DeleteClaims | Removes the values for the specified claims that have been associated with a specific user account. |
| DeleteClaimsPrincipal | Deletes a specific user account. |
Input Claims
Regardless of which operation you want to perform, you need to provide an Input Claim that acts as a key for the user account that you want to work with. Claims that can be used as keys include:
| Claim | Description |
|---|---|
| objectId | The unique ID GUID assigned to a user account when it is created in Azure Active Directory. |
| userPrincipalName | An “internet-style” login name for a user that is managed by Azure AD B2C. A User Principal Name (UPN) in AAD has the format “[email protected]”. UPN’s must be unique within an Azure AD tenant. |
| signInNames | Represents different values that a user can use to sign in. For local Azure AD B2C accounts, these can include emailAddress or userName. |
| alternativeSecurityId | The user identifier for an account that is actually federated from an external Identity Provider (such as Facebook). |
It is important to note that the AAD Technical Profiles require one – and it must be only one – key entry in their Input Claims collection.
Persisted and Output Claims
The claims that are written or updated in storage – either via a Write or a DeleteClaims operation – are indicated in the AAD Technical Profile’s PersistedClaims collection. Note that for Write or DeleteClaims operations, the Input Claim that is used as a key MUST also be included in the Persisted Claims collection.
When using Write operations, claim values can be returned from the AAD Technical Profile by indicating them in the AAD Technical Profile’s OutputClaims collection.
NOTE:
Azure AD B2C requires that a non-emptydisplayNameclaim value must be set for user accounts. This means that when the Write operation is used to create a new user, a displayName value must be provided. If one is not available, an empty claim can be used along with aDefaultValueattribute declaration that sets the value to a predetermined non-empty string (like “Not Set”.) When using the Write operation to update a user account, if thedisplayNamevalue is being set, it must be non-empty.
Similar to Write, claims that are being read from storage in a Read operation need to be indicated in the AAD Technical Profile’s OutputClaims collection. Persisted Claims are not used in Read operations.
To complete the discussion of the claims settings for the various operations, the DeleteClaimsPrincipal operation only uses the key value in the Input Claims collection to indicate which user account to remove. Persisted Claims and Output Claims are not used.
Working with Errors
Depending on the use-case that you are implementing with an instance of an AAD Technical Profile, there are a couple of circumstances where you might want to indicate that an error has occurred. Consider:
- You are trying to read, update, or delete user account information, but the indicated user account does not exist.
- You are trying to create a new user account, but a user account with the indicated identifier already exists.
The AAD Technical Profile provides Metadata settings that you can use to instruct it to look for either of these situations and return an error message. The RaiseErrorIfClaimsPrincipalDoesNotExist entry can be set to true to flag the condition where an expected user account is not present, and you can indicate the error message to display if this occurs by setting the UserMessageIfClaimsPrincipalDoesNotExist Metadata entry. Likewise, the RaiseErrorIfClaimsPrincipalAlreadyExists entry can be set to true to flag the condition where a user account that should not already exist is in fact present, and you can indicate the error message to display if this occurs by setting the UserMessageIfClaimsPrincipalAlreadyExists Metadata entry.
Working with User Accounts with the AAD Technical Profile
Enough background. Let’s update our policy to actually store the information it collects into the Azure AD database.
Adding the User Account
Start by replacing the existing objectId claim definition in your policy with the following more complete version, taken from the Azure AD B2C Custom Policy Starter Pack policies:
<ClaimType Id="objectId">
  <DisplayName>User's Object ID</DisplayName>
  <DataType>string</DataType>
  <DefaultPartnerClaimTypes>
    <Protocol Name="OAuth2" PartnerClaimType="oid" />
    <Protocol Name="OpenIdConnect" PartnerClaimType="oid" />
    <Protocol Name="SAML2" PartnerClaimType="http://schemas.microsoft.com/identity/claims/objectidentifier" />
  </DefaultPartnerClaimTypes>
  <UserHelpText>Object identifier (ID) of the user object in Azure AD.</UserHelpText>
</ClaimType>
Also, add the following declarations for a new userPrincipalName claim and a new passwordPolicies claim, also taken from the same Starter Pack policy files:
<ClaimType Id="userPrincipalName">
  <DisplayName>UserPrincipalName</DisplayName>
  <DataType>string</DataType>
  <DefaultPartnerClaimTypes>
    <Protocol Name="OAuth2" PartnerClaimType="upn" />
    <Protocol Name="OpenIdConnect" PartnerClaimType="upn" />
    <Protocol Name="SAML2" PartnerClaimType="http://schemas.microsoft.com/identity/claims/userprincipalname" />
  </DefaultPartnerClaimTypes>
  <UserHelpText>Your user name as stored in the Azure Active Directory.</UserHelpText>
</ClaimType>

<ClaimType Id="passwordPolicies">
  <DisplayName>Password Policies</DisplayName>
  <DataType>string</DataType>
  <UserHelpText>Password policies used by Azure AD to determine password strength, expiry etc.</UserHelpText>
</ClaimType>
Now add a new ClaimsProvider that we’ll use to house the AAD Technical Profiles that we create:
<ClaimsProvider>
  <!--
  The technical profiles defined in this section wok with Azure Active Directory.
  -->
  <DisplayName>Azure Active Directory Technical Profiles</DisplayName>
  <TechnicalProfiles>

  </TechnicalProfiles>
</ClaimsProvider>
And in that Claims Provider, add the following AAD Technical Profile:
<TechnicalProfile Id="AADUserWriter">
  <DisplayName>Write user information to AAD</DisplayName>
  <Protocol Name="Proprietary" Handler="Web.TPEngine.Providers.AzureActiveDirectoryProvider, Web.TPEngine, Version=1.0.0.0, Culture=neutral, PublicKeyToken=null"/>
  <Metadata>
    <Item Key="Operation">Write</Item>
    <Item Key="RaiseErrorIfClaimsPrincipalAlreadyExists">true</Item>
    <Item Key="UserMessageIfClaimsPrincipalAlreadyExists">The account already exists.</Item>
  </Metadata>
  <InputClaims>
    <InputClaim ClaimTypeReferenceId="email" PartnerClaimType="signInNames.emailAddress" Required="true" />
  </InputClaims>
  <PersistedClaims>
    <PersistedClaim ClaimTypeReferenceId="email" PartnerClaimType="signInNames.emailAddress" />

    <PersistedClaim ClaimTypeReferenceId="displayName"/>
    <PersistedClaim ClaimTypeReferenceId="givenName"/>
    <PersistedClaim ClaimTypeReferenceId="surname"/>
    <PersistedClaim ClaimTypeReferenceId="passwordText" PartnerClaimType="password"/>
    <PersistedClaim ClaimTypeReferenceId="passwordPolicies" DefaultValue="DisablePasswordExpiration,DisableStrongPassword" />
  </PersistedClaims>
  <OutputClaims>
    <OutputClaim ClaimTypeReferenceId="objectId"/>
    <OutputClaim ClaimTypeReferenceId="userPrincipalName"/>
    <OutputClaim ClaimTypeReferenceId="email" PartnerClaimType="signInNames.emailAddress"/>
  </OutputClaims>
</TechnicalProfile>
This new AAD Technical Profile is configured as a Write operation. It uses the email claim, mapped to the signInNames.emailAddress value as the key identifier for the user account being written, and has create semantics because the metadata is configured to return an error if a user account specified by the given email address already exists.
The Technical Profile is configured to write the displayName, givenName, and surname information claims that have been collected by the policy up to this point. There is also a new claim called passwordText that is introduced – don’t worry about it right now, it’s purpose will be explained in the next section.
The Technical Profile also writes a new claim – passwordPolicies – which is used to provide Azure AD with a list of comma-separated values that determine how Azure AD will treat the provided password. “DisablePasswordExpiration” must be specified – Azure AD B2C does not currently work with automatic password expiration that the “full” Azure AD supports. Also, if you are enforcing any custom password complexity rules, you must specify “DisableStrongPassword”.
NOTE:
As mentioned above, Azure AD B2C does not currently work with automatic password expiration that the “full” Azure AD supports. If you find that you require password expiration, a sample policy is available that shows how you can implement it yourself. However, before you race to add password expiration to your policies, please be sure to consider that password expiration – although once considered best practice – is now considered to be an anti-pattern in account security. Multiple security authorities now actively recommend against it, including the US Department of Commerce National Institute of Standards and Technology (NIST), the UK National Cyber Security Centre (NCSC), and Microsoft itself.
Special Handling for Passwords
We first used a Claims with a UserInputType value of Password when we collected the accessCode and password claims earlier in this series (copied here for reference):
<ClaimType Id="accessCode">
  <DisplayName>Access Code</DisplayName>
  <DataType>string</DataType>
  <UserHelpText>Enter your invitation access code.</UserHelpText>
  <UserInputType>Password</UserInputType>
  <Restriction>
    <Pattern RegularExpression="[0-9][0-9][0-9][0-9][0-9]" HelpText="Please enter your invitation access code."/>
  </Restriction>
</ClaimType>
...
<ClaimType Id="password">
  <DisplayName>Password</DisplayName>
  <DataType>string</DataType>
  <AdminHelpText>Enter password</AdminHelpText>
  <UserHelpText>Enter password</UserHelpText>
  <UserInputType>Password</UserInputType>
</ClaimType>
There are some special behaviors you should be aware of when you use a User Input Type of password in a Self-Asserted Technical Profile. In particular, the Identity Experience Framework recognizes these as “special” values and as a result only makes the value that has been entered available within the Self-Asserted Technical Profile in which the data was collected, or within Validation Technical Profiles that are referenced by that same Self-Asserted Technical Profile. Once execution “leaves” the current Technical Profile, the value is lost.
When we validated the user’s accessCode value, the Claims Transformation and HTTP Technical Profiles that were used to perform the validation were called from within the Self-Asserted Technical Profile that collected the user’s access code. However, in this exercise, we want to store the user’s password, but we need to defer creating the user in AAD until after they have completed the next Technical Profile after they entered their data.
Writing user to AAD sequence
So how can we retain the user’s password across these extra steps? In a nutshell, we use a Validation Technical Profile to copy the password into a different claim, and then use that one. This is the purpose behind the passwordText claim that we previously mentioned.
Add the following Claim declaration in the policy’s Claims Schema section:
<ClaimType Id="passwordText">
  <DataType>string</DataType>
</ClaimType>
This defines the passwordText claim, which will be used to hold a copy of the password entered by the user.
Next, add the following Claims Transformation, which uses the CopyClaim method to copy the password claim value into the passwordText claim:
<ClaimsTransformation Id="CopyPassword" TransformationMethod="CopyClaim">
  <InputClaims>
    <InputClaim ClaimTypeReferenceId="password" TransformationClaimType="inputClaim"/>
  </InputClaims>
  <OutputClaims>
    <OutputClaim ClaimTypeReferenceId="passwordText" TransformationClaimType="outputClaim"/>
  </OutputClaims>
</ClaimsTransformation>
Now locate the UserInformationCollector Technical Profile and add the following Claims Transformation Technical Profile immediately after it:
<TechnicalProfile Id="PasswordCopier">
  <DisplayName>Copy Password Profile</DisplayName>
  <Protocol Name="Proprietary" Handler="Web.TPEngine.Providers.ClaimsTransformationProtocolProvider, Web.TPEngine, Version=1.0.0.0, Culture=neutral, PublicKeyToken=null"/>
  <InputClaimsTransformations>
    <InputClaimsTransformation ReferenceId="CopyPassword"/>
  </InputClaimsTransformations>
  <OutputClaims>
    <OutputClaim ClaimTypeReferenceId="passwordText" Required="true"/>
  </OutputClaims>
</TechnicalProfile>
This Claims Transformation Technical Profile simply performs the CopyClaim Claims Transformation operation we just defined and outputs the updated passwordText claim.
Next, add the following Validation Technical Profile declaration to the ValidationTechnicalProfiles element in the UserInformationCollector Self-Asserted Technical Profile.
<ValidationTechnicalProfile ReferenceId="PasswordCopier"/>
The exact position in the list of Validation Technical Profiles is not critical, though I prefer to add it to the end of the list so that the password is not copied until all other validation in the Technical Profile has successfully occurred.
Finally, add the following Output Claim to the Technical Profile’s Output Claims collection so that the copied claim is placed into the Claims Bag:
<OutputClaim ClaimTypeReferenceId="passwordText"/>
NOTE:
It has been stated before, but it bears repeating. Be VERY careful with password data within your policies. Passwords are precious cargo. There is a reason the Identity Experience Framework treats the claims associated with their data collection with special rules. If you have to take steps like the ones shown above to perform additional work with these values, make sure you go back ensure you are not placing those values in logs, outputs, HTTP calls, or other places accidentally, since leaking user account credentials like passwords can have far-reaching consequences.
Now the passwordText Claim that was referenced in the previous section is populated with the user input, and the user information is ready to be sent to Azure Active Directory.
Updating the User Journey Orchestration Steps
With the AAD Write Technical Profile and related Validation Technical Profiles in place, you need to update the User Journey to call the write operation as one of its orchestration steps. Add the following Orchestration Step into the User Journey, just before the existing SendClaims step:
<OrchestrationStep Order="5" Type="ClaimsExchange">
  <ClaimsExchanges>
    <ClaimsExchange Id="AADUserWriterExchange" TechnicalProfileReferenceId="AADUserWriter"/>
  </ClaimsExchanges>
</OrchestrationStep>
Also, update the Order of the SendClaims step to now be step “6”.
Now upload the updated policy, run it, and enter user information as you have previously. The policy should complete and you should see the set of claims returned in the JWT Token as you have before. Congratulations! You have just used a custom policy to add a B2C User Account to the Azure AD database!
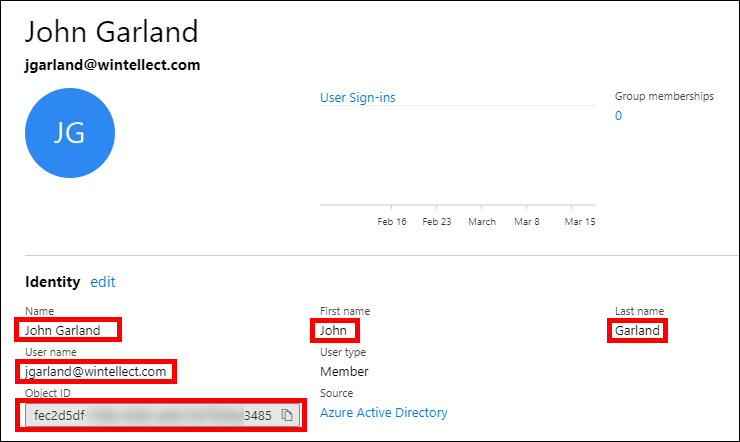
Return to the Azure Portal and click Users in the menu on the left side. You will now see your new user account added to the set of user accounts in your AAD B2C tenant. Click on the user’s name and the portal will display the user account Profile page where you should be able to see the user’s display name, first name, last name, and email address, as well as the Object ID value for the user account.
User profile details
Notice the Object ID value for the user account will now match the value of the “sub” claim that was returned in the JWT token. In fact, the GetObjectIdClaimsExchange Orchestration Step, the GenerateObjectIdTransformation Claims Transformation, and the RandomObjectIdClaimGenerator Technical Profile that work together to create a random GUID value for the objectId claim are is no longer used/needed, since the objectId value is created by Azure AD when the user is created. We will remove these elements later.
Reading and Updating User Accounts
Go back and re-run the policy, using an email address for a user account that already exists in your Azure AD B2C tenant. You should receive an error, since we specifically indicated in the Technical Profile’s Metadata that IEF should check for this and raise an error if it occurrs.

Account already exists error
You could use the Azure Portal to delete the user account that you just created, then run your custom policy and and create the user account again. Instead, let’s update our policy to try to first read the account with the given email address, and then to either create the account if it does not exist or update the account if it does.
First, we need to add the following new claim declaration, which we’ll use to help us see if we’ve updated the user’s display name in their account:
<ClaimType Id="originalDisplayName">
  <DataType>string</DataType>
</ClaimType>
Now let’s add an AAD Technical Profile to handle trying to read the user account. Locate the AAD Claims Provider section you added previously and add the following AAD Technical Profile to it:
<TechnicalProfile Id="AADUserReader">
  <DisplayName>Update user information to AAD</DisplayName>
  <Protocol Name="Proprietary" Handler="Web.TPEngine.Providers.AzureActiveDirectoryProvider, Web.TPEngine, Version=1.0.0.0, Culture=neutral, PublicKeyToken=null"/>
  <Metadata>
    <Item Key="Operation">Read</Item>
    <Item Key="RaiseErrorIfClaimsPrincipalAlreadyExists">false</Item>
    <Item Key="RaiseErrorIfClaimsPrincipalDoesNotExist">false</Item>
  </Metadata>
  <InputClaims>
    <InputClaim ClaimTypeReferenceId="email" PartnerClaimType="signInNames.emailAddress" Required="true" />
  </InputClaims>
  <OutputClaims>
    <OutputClaim ClaimTypeReferenceId="objectId"/>
    <OutputClaim ClaimTypeReferenceId="userPrincipalName"/>
    <OutputClaim ClaimTypeReferenceId="originalDisplayName" PartnerClaimType="displayName"/>
  </OutputClaims>
</TechnicalProfile>
This AAD Technical Profile is configured to perform a Read operation, and will not throw errors if the user exists or not. It uses the email claim mapped to the signInNames.emailAddress value to look up the provided email address, and if found, will return the account’s objectId, userPrincipalName, and displayName values, with the displayName value mapped to our new originalDisplayName claim.
We’ll add once more AAD Technical Profile to handle updating a pre-existing user account:
<TechnicalProfile Id="AADUserUpdater">
  <DisplayName>Update user information to AAD</DisplayName>
  <Protocol Name="Proprietary" Handler="Web.TPEngine.Providers.AzureActiveDirectoryProvider, Web.TPEngine, Version=1.0.0.0, Culture=neutral, PublicKeyToken=null"/>
  <Metadata>
    <Item Key="Operation">Write</Item>
    <Item Key="RaiseErrorIfClaimsPrincipalAlreadyExists">false</Item>
    <Item Key="RaiseErrorIfClaimsPrincipalDoesNotExist">true</Item>
    <Item Key="UserMessageIfClaimsPrincipalDoesNotExist">The account does not exist.</Item>
  </Metadata>
  <InputClaims>
    <InputClaim ClaimTypeReferenceId="objectId" Required="true" />
  </InputClaims>
  <PersistedClaims>
    <PersistedClaim ClaimTypeReferenceId="objectId"/>
    <PersistedClaim ClaimTypeReferenceId="displayName"/>
    <PersistedClaim ClaimTypeReferenceId="givenName"/>
    <PersistedClaim ClaimTypeReferenceId="surname"/>
    <PersistedClaim ClaimTypeReferenceId="passwordText" PartnerClaimType="password"/>
    <PersistedClaim ClaimTypeReferenceId="passwordPolicies" DefaultValue="DisablePasswordExpiration,DisableStrongPassword" />
  </PersistedClaims>
  <OutputClaims>
    <OutputClaim ClaimTypeReferenceId="displayName"/>
  </OutputClaims>
</TechnicalProfile>
This AAD Technical Profile is configured to perform a Write operation. However, instead of indicating an error if the account already exists, this one is configured for Update semantics, since it indicates an error if specified account does NOT already exist. Also, instead of using the email address to locate the account (which would be fine under these circumstances), it uses the actual objectId claim that was retrieved by the Read operation. It then sends in the new displayName, givenName, surname, and password values, once again having to specify the passwordPolicies claim that was discussed previously.
With these new AAD Technical Profiles in place, we once again need to update the User Journey to first call the Read operation and then call the correct Write operation in the orchestration steps, depending on what is returned from the Read operation.
Remove the AADUserWriterExchange Orchestration Step that you added previously and replace it with the following three Orchestration Steps:
<OrchestrationStep Order="5" Type="ClaimsExchange">
  <ClaimsExchanges>
    <ClaimsExchange Id="AADUserReaderExchange" TechnicalProfileReferenceId="AADUserReader"/>
  </ClaimsExchanges>
</OrchestrationStep>

<OrchestrationStep Order="6" Type="ClaimsExchange">
  <Preconditions>
    <Precondition Type="ClaimsExist" ExecuteActionsIf="false">
      <Value>userPrincipalName</Value>
      <Action>SkipThisOrchestrationStep</Action>
    </Precondition>
  </Preconditions>
  <ClaimsExchanges>
    <ClaimsExchange Id="AADUserUpdaterExchange" TechnicalProfileReferenceId="AADUserUpdater"/>
  </ClaimsExchanges>
</OrchestrationStep>

<OrchestrationStep Order="7" Type="ClaimsExchange">
  <Preconditions>
    <Precondition Type="ClaimsExist" ExecuteActionsIf="true">
      <Value>userPrincipalName</Value>
      <Action>SkipThisOrchestrationStep</Action>
    </Precondition>
  </Preconditions>
  <ClaimsExchanges>
    <ClaimsExchange Id="AADUserWriterExchange" TechnicalProfileReferenceId="AADUserWriter"/>
  </ClaimsExchanges>
</OrchestrationStep>
These steps first use the AADUserReader Technical Profile to try to read the account from the Azure AD database based on the provided email address. If the account exists, it will return a value in the userPrincipaName claim.
The AADUserUpdaterExchange step will examine the userPrincipalName claim. If the claim does not exist (the Precondition Type="ClaimsExist" ExecuteActionIf="false" equates to “if the claim does not exist”), the step is skipped. Turned around a little bit – “if the userPrincipalName claim exists, run the Technical Profile in this step”. This results in the AADUserUpdater AAD Technical Profile being run.
The (new) AADUserWriterExchange step will once again examine the userPrincipalName claim. If the claim does exist, then the step is skipped. If the claim does not exist (the user was not located by the Read step), then the AADUserWriter AAD Technical Profile is run, which results in the creation of the new account.
NOTE:
We could have also used the objectId claim instead of the userPrincipalName claim, except that we still have an old step in our policy that generates an objectId value with a random GUID. This value is not used in our policy anymore, since the Read or Update AAD Technical Profiles will populate the objectId value from the value that is generated for the user in the Azure AD database. For now, we’re leaving the old “code” in here and just using userPrincipalName, though in most other code, the use of the objectId claim for this purpose is much more common.
Two more quick things to do. First, update the Order of the SendClaims Orchestration Step to now be “8”.
The last step is to add a new Output Claim to the policy’s Relying Party section. This will either return the original display name value that was obtained when the user was read (indicating we have updated the user name), or if no value is present, the DefaultValue will be used to return “Not previously set.”
<OutputClaim ClaimTypeReferenceId="originalDisplayName" DefaultValue="Not previously set"/>
Now upload the updated policy, run it, and once again enter user information as you have previously. You will see that if you use an email address that you used previously, the policy should now succeed, and you can see any changes you made to the user’s name in the returned claims or in the Azure Portal Profile page for the account. With an update that affects the account’s Display Name, you should also see the Display Name reflected in the originalDisplayName claim. Creating an account with a new user email address should continue to work as well, and the originalDisplayName claim should be returned as Not previously set.
Working with Custom Claims
The claims that we have written to and read from the Azure AD database so far have included well-known identifiers (objectId, userPrincipalName, email) and basic user attributes (givenName, surname, displayName, password). But what about more application-specific claims like our accountType value?
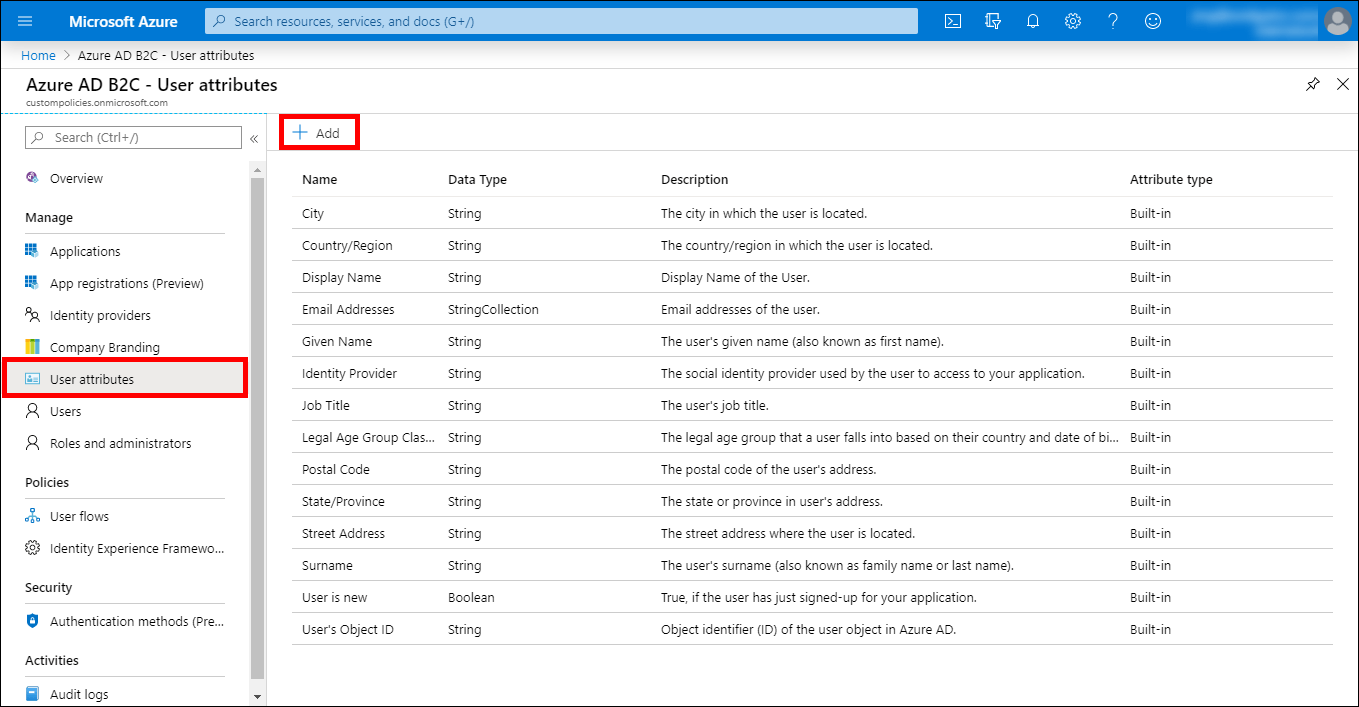
It turns out that Azure AD B2C only has direct support for certain claims which can be saved to and retrieved from Azure AD. Beyond those, you need to consider working with Custom Claims (also known as Extension Claims). The out-of-the-box (or built-in) supported user attribute claims are defined by Azure AD, and the ones which you would use for user properties (there are some internal ones like objectId, userPrincipalName, and passwordPolicies) can be found in the User attributes section of the Azure AD B2C configuration section in the Azure Portal. This list is reproduced for your convenience below:
| Display Name | Claim Name | Data Type |
|---|---|---|
| City | city | String |
| Country/Region | country | String |
| Display Name | displayName | String |
| Email Addresses | emails | StringCollection |
| Given Name | givenName | String |
| Identity Provider | identityProvider | String |
| Job Title | jobTitle | String |
| Legal Age Group Classification | ageGroup | String |
| Postal Code | postalCode | String |
| Street Address | streetAddress | String |
| State/Province | state | String |
| Surname | surname | String |
| User’s Object ID | objectId | String |
To support claims beyond these, Azure AD has support for Custom Claims (sometimes also called Custom Attributes or Extension Properties).
Configuring a Custom Claim
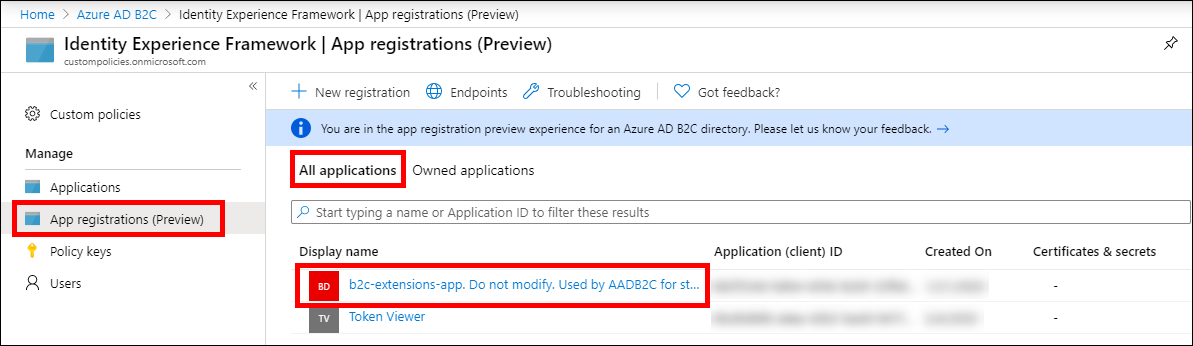
Custom Claims in Azure AD B2C are actually registered against an application within the Azure AD database. It turns out that when an Azure AD B2C tenant is created, a special application is created which is used by the Built-In policy declarations to register Custom Claims. By using this same application, you can register Custom claims that can be used both by Built-In policy declarations as well as custom policies. This application is titled “b2c-extensions-app. Do not modify. Used by AADB2C for storing user data.” (more conventionally just referred to as the “b2c-extensions-app“) and can be found in the Azure Portal by selecting App Registrations (Preview) from the Azure AD B2C menu and choosing All Applications.
The Azure AD B2C extensions app
Using the Azure Portal to Register a Custom Claim
One way you can work with Custom Claims is to use the Azure Portal to register the Custom Claim with the B2C Extensions App and view the Extension/Custom claims that have been registered against that app.
In the Azure Portal menu for your B2C tenant select User attributes. Then click +Add.
Adding a new custom attribute
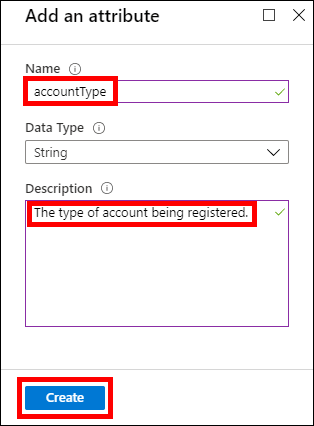
In the Add an attribute dialog, enter the name accountType, provide a description, and click Create.
Creating the Account Type attribute
NOTE:
Declaring Custom Claims ahead of time like this is not essential if you are just working with custom policies, but it can be helpful for a couple of reasons. First, if you do plan to work with built-in policies, you will need to declare the Custom Claims you plan to use via the Azure Portal like this. Also, when a Custom Claim that is declared exclusively in a policy is stored for the first time, there is a chance that Azure AD may return an error on that initial operation. So it is important to “use the claim” first before end-users may access it, which is not required if you use the Portal. On the other hand, if you do declare a Custom Claim with the Azure Portal, you are currently limited to the string, boolean, and integer data types.
Configuring the Custom Policy to Store and Retrieve a Custom Claim
When an Azure AD Technical Profile is attempting to read or write a Custom Claim, the claim reference must use a special syntax to address the claim. This syntax has the format extension_claimName. One way to ensure you are properly addressing the claim is to actually declare the claim in the Claims Schema section of the policy with that syntax. Another option is to leverage the PartnerClaimType attribute in the Azure AD Technical Profiles to indicate the alternate declaration.
Locate the AADUserWriter and AADUserUpdater Technical Profiles and add the following entry to both of their Persisted Claims collections.
<PersistedClaim ClaimTypeReferenceId="accountType" PartnerClaimType="extension_accountType"/>
Notice how the local Claim declaration of accountType is being mapped to the name extension_accountType in order to write the value to the Azure AD database.
Finally, we need to provide Azure AD Technical Profiles with some Metadata information that describes the Application they will use for managing Custom Claims. To obtain the information we need, we will need to return to the B2C Extension Application in the Azure Portal. Select App registrations (Preview) from the Azure AD B2C menu and choose All Applications. Then click the title of the b2c-extensions-app entry to bring up the application details:

The Azure AD B2C extensions app
Copy both the Application (client) ID and Object ID values so that you can use them in the next step.
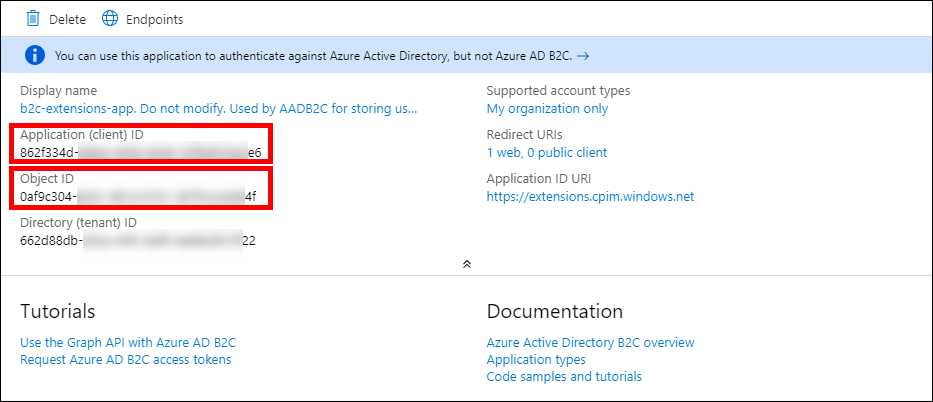
Copying the Application and Object IDs
Now add the following entries to the Metadata section for both the AADUserWriter and AADUserUpdater AAD Technical Profiles, substituting the Object and Application (Client) IDs that you just obtained:
<Item Key="ApplicationObjectId">OBJECT_ID</Item>
<Item Key="ClientId">APPLICATION(CLIENT)_ID</Item>
If you want to read the value of the Custom Claim, you would need to update the Read Technical Profile as well. There’s also a way to “share” this information between all of your AAD Technical Profiles so you do not have to maintain it in two or three different places. We’ll discuss that and a few other cleanup options in a later post in this series.
Now upload the updated policy, run it, and enter user information as you have previously. Once more, the policy should complete and you should see the set of claims returned in the JWT Token. But how can we check to see if the Custom Claim is really being saved?
Working with the Microsoft Graph Explorer
Because Custom Claims are not part of the standard user account attributes, they are not displayed in the Azure Portal’s User Account information page. So how can you see the accountType value that your user has set? One option is to build another policy that returns the accountType value as one of its claims. And while that will work, another approach you can take is to use the Microsoft Graph and related tools like the Microsoft Graph Explorer, which we’ll discuss here.
The Microsoft Graph Explorer is an interactive web-based tool that lets you make requests to the Microsoft Graph. You can learn more about the Microsoft Graph Explorer in the Microsoft Graph Best Practices documentation.
While the Microsoft Graph Explorer is an excellent tool for analyzing content in the Microsoft Graph, it is a bit nuanced. Today, when you sign a user into the Microsoft Graph Explorer, the Graph Explorer does not prompt or otherwise allow you to choose an Azure AD tenant. Instead, it discovers the signed-in user’s home tenant and provides interaction with that specific Azure AD instance. This means that you cannot use the Global Administrator account that was configured to manage your Azure AD B2C tenant when you created it, as that user was most likely a member of the Azure AD tenant that was attached to the Azure subscription from which you created the Azure AD B2C instance and was brought in as a “Guest User” to the Azure AD B2C tenant.
Create the Graph Explorer User Account
So how can you use the Microsoft Graph Explorer to examine an Azure AD B2C tenant? The answer is that you have to create a dedicated user account within the Azure AD B2C tenant and use that account to sign in to the Microsoft Graph Explorer.
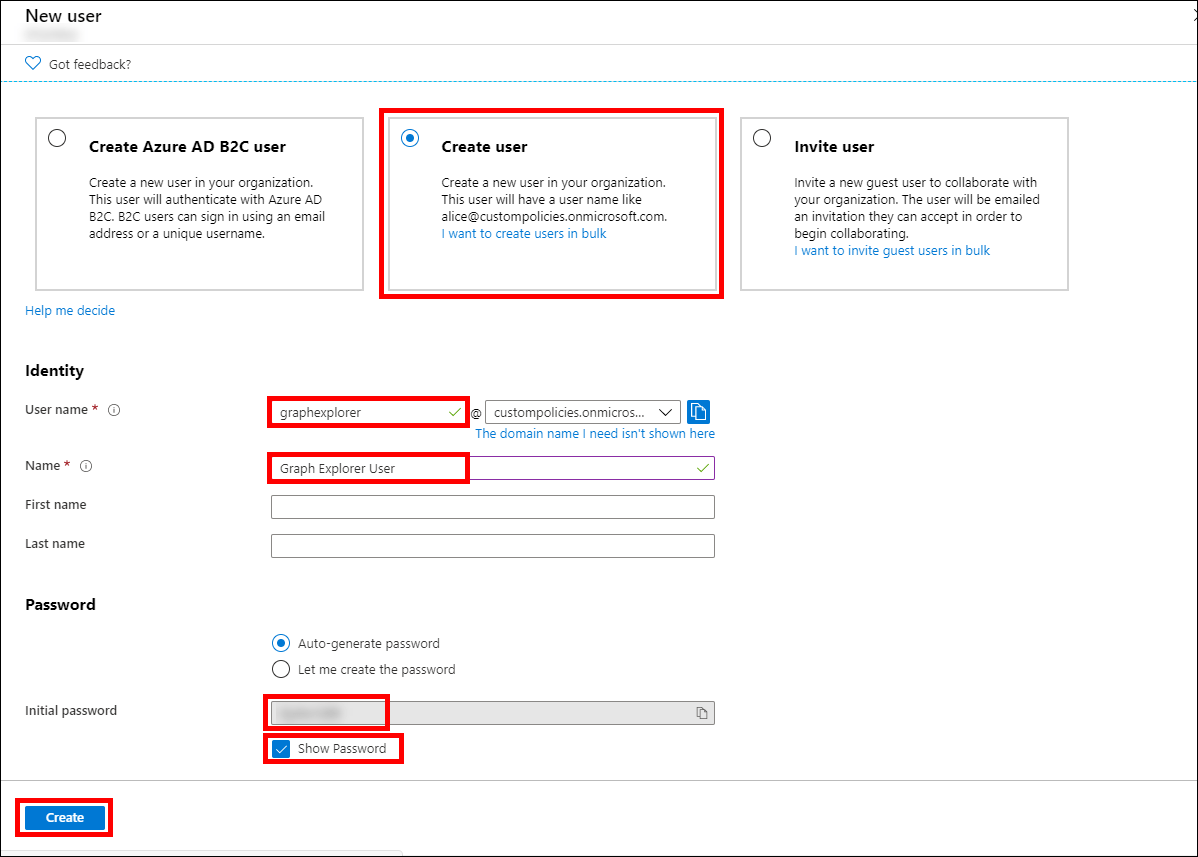
Return to the Azure Portal and click Users in the menu on the left side. Then click +New User.
In the New user page, select the Create user option and enter User name and Name values. In the Password section, click the Show Password checkbox and copy the single-use password that has been generated for this user. Scroll down to the Groups and roles section and click the User link next to the word Roles. In the Directory roles panel, check Global Administrator and then click Select. Finally, click Create at the bottom of the page.
Create the Graph Explorer user account
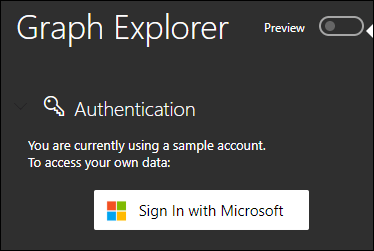
Sign In to the Graph Explorer
Navigate to the Graph Explorer site at https://developer.microsoft.com/graph/graph-explorer. In the upper left side, click the Sign in with Microsoft button and sign in with the credentials for the Graph Explorer account that you just created. You will need to reset your password from the single-use password value that you previously recorded, and you will also need to consent to the set of permissions being requested by the Graph Explorer application.
Sign in to the Graph Explorer
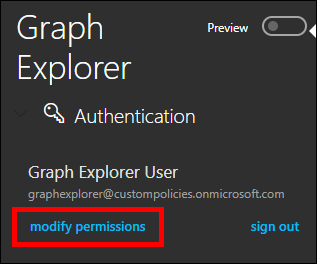
Once you have signed into the Graph Explorer site, click modify permissions underneath the username that you signed in with.
Select modify permissions in the Graph Explorer
In the Modify Permissions dialog, scroll down to Directory.ReadAll and check the box next to it. Then click the Modify Permissions button. Sign back in to the Graph Explorer with your Graph Explorer account credentials and grant the Read directory data permission request.
Showing the Application Extension Property Registration
As previously mentioned, Custom Claims are registered as Extension Properties in Azure AD. Let’s use the Graph Explorer to see the Extension Property registration for the accountType claim with the B2C Extensions app.
Enter the following URL in the query bar at the top of the Microsoft Graph Explorer:
https://graph.microsoft.com/beta/applications?$filter=startswith(displayName,'b2c')
The details for the B2C Extensions Application object should now be displayed in the Response Preview section of the Microsoft Graph Explorer. Locate the ID property and copy the value (this should match the ApplicationObjectId entries that you used in the Metadata for the AAD Technical Profiles.)
Now enter the following URL in the query bar at the top of the Microsoft Graph Explorer, substituting the ID you just copied for the APPLICATION_ID value:
https://graph.microsoft.com/beta/applications/APPLICATION_ID/extensionProperties
This should return the extension property registrations for the B2C Extensions application:
{
    ...
    "value": [
        {
            ...
            "name": "extension_CLIENTID_accountType",
            "dataType": "String",
            ...
            "targetObjects": [
                "User"
            ]
        }
    ]
}
Notice that the name of the extension property entry has the syntax extension_{ClientID}_{claimName}, with the ClientID GUID value matching the ClientId entries that you used in the Metadata for the AAD Technical Profiles. This syntax is also similar to the reference name used in the policy’s Azure AD Technical Profiles (extension_{claimName}), except that in the policy, the {ClientId} portion is omitted.
Showing the Property Value for a User
Enter the following URL in the query bar at the top of the Microsoft Graph Explorer:
https://graph.microsoft.com/beta/users?$filter=creationType eq 'LocalAccount'
This will return the local user accounts created in your Azure AD B2C tenant. Scroll through the property names to locate the extension_{ClientID}_accountType claim, where you can now see the value that has been saved for the user being displayed:
{
    ...
    "value": [
        {
            ...
            "creationType": "LocalAccount",
            ...
            "displayName": "John Garland",
            ...
            "givenName": "John",
            "surname": "Garland",
            ...
            "extension_CLIENTID_accountType": "company",
            ...
            "identities": [
                {
                    "signInType": "emailAddress",
                    "issuer": "custompolicies.onmicrosoft.com",
                    "issuerAssignedId": "[email protected]"
                },
                {
                    "signInType": "userPrincipalName",
                    "issuer": "custompolicies.onmicrosoft.com",
                    "issuerAssignedId": "..."
                }
            ]
            ...
        }
    ]
}
Prebuilt Policy File and Resources
If you had any problems following along or if you ran into a problem that you could not quite solve, a completed version of the policy that was developed in this post is available for download. You can download a copy of that file here. Be sure to update the TenantId, PolicyId, and PublicPolicyUri attributes to the correct values from your AAD B2C tenant, update the YOUR_API_URL entries, and (if you used different names) replace your own cryptographic key names in the JWTIssuer TechnicalProfile element. Finally, you will also need to replace the OBJECT_ID and APPLICATION(CLIENT)_ID values in the Azure AD Technical Profile Metadata sections to match the corresponding values from the B2C Extensions App as is described above.
In addition to the policy file, the Visual Studio ASP.NET Core Web solution that was used to create and deploy the Web API that was introduced in the previous post is also available for download. You can download a copy of that project here.
Recap
In this post you saw how the Azure Active Directory Technical Profile can be used to read, write, and update user account data in your Azure Active Directory tenant. You also saw how you could register and use Custom Claims to store and retrieve data beyond the default set of Claims that Azure AD B2C and the Identity Experience Framework make available to you and your policies. Finally, you saw how you could use the Microsoft Graph (via theMicrosoft Graph Explorer) to retrieve information stored in the Azure Active Directory tenant beyond what is shown by default fro User Accounts in the Azure Portal.
Although your policy at this point is able to store a user in Azure AD and is returning claims about a stored user, it is not yet actually really authenticating the user. It is only storing user account information and echoing claims entered in the user interface.
In the next post in this series we will show you how you can go about authenticating users against their saved credentials by making use of a new Technical Profile that can extend your policy to making OpenID Connect (OIDC) calls.