This post continues a series that provides a walkthrough illustrating how to work with Azure Active Directory B2C custom policies by building one from the ground up. As the series progresses, the topics will serve to show how the different parts of the AAD B2C policy syntax and the underlying framework can be brought together to realize desired functionality. At the conclusion of the series, you should be ready to both understand existing AAD B2C policies and to create new ones for yourself.
The topic areas being covered in this series are:
| Topic | Focus Area |
|---|---|
| Introduction | |
| Hello World! <– You are here | Returning a simple message with a custom policy |
| Hello [Your Name Here]! | Custom policy elements and syntax, how to collect and work with user input |
| Hello! (But Only If You Have an Access Code) | How to perform basic input validation |
| Hello! (NOW WITH REST!) | How to make REST calls to external services for validation or information exchange |
| Hello! Let’s Add a User | How to use the backing Azure Active Directory database to store and retrieve user information |
| Hello! Please Either Sign In or Sign Up | How to either sign in an existing user or allow a new user to sign up |
| Hello! It’s Time To Clean Up a Bit | How to use multiple files and a policy file hierarchy to manage and reuse policy content |
NOTE
This walkthrough is intended for developers who want to learn how to leverage AAD B2C Custom Policies. The content assumes you understand basic AAD B2C concepts such as how to make use of the built-in policies to implement basic user management and authentication tasks. Basic functional tutorials for AAD B2C can be found in the online documentation here.
Catching Up
Up to this point we have discussed a little bit of background about custom policies in AAD B2C and introduced the idea of considering the custom policy XML syntax as a programming language for the runtime provided by the Identity Experience Framework. We then prepared and uploaded the smallest possible custom policy that could successfully be parsed by the Identity Experience Framework. However, that policy wasn’t terribly useful – it was basically an empty program. We need to do a bit more to get to “Hello World.”
Declaring Claims
Start with the policy file from the previous post in this series. Alternatively, you can download a copy of that file here, being sure to update the TenantId, PolicyId, and PublicPolicyUri attributes to the correct values from your AAD B2C instance. Add the following BuildingBlocks section to the policy file as the first child element of the TrustFrameworkPolicy element, just before the ClaimsProviders element that is already there:
<BuildingBlocks>
  <ClaimsSchema>
    <ClaimType Id="objectId">
      <DataType>string</DataType>
    </ClaimType>
    <ClaimType Id="message">
      <DataType>string</DataType>
    </ClaimType>
  </ClaimsSchema>
</BuildingBlocks>
The newly added BuildingBlocks element contains a ClaimsSchema element. The Claims Schema section is where you define the “variables” that will be used within the policy “program”. In this case, two variables are being declared by using ClaimType elements.
The first declaration is for the objectId claim/variable. OpenID Connect policies are required to include a claim that uniquely identifies the subject of the claims being returned from the invocation of the policy, where the subject of an OpenID Connect operation is basically the end-user. We’ll learn later that Azure Active Directory uses the claim objectId to identify users and other artifacts that it stores, so we will use the same ID name here in order to simplify things later.
When you declare a claim, in addition to an ID you must also indicate a Data Type for that claim. In this case, the objectId claim has its DataType set to string since it will be used to hold text values.
The second declaration is very similar. We are declaring a claim/variable with an ID of message also with a Data Type of string. This is the claim that will be used to return our “Hello World” message.
Configuring Token Creation
Any claims being provided by an OpenID Connect policy must be included in a token that is produced by the policy and returned to the policy’s caller. To do this, we need to configure the policy to use a JWT Token Issuer.
Configuring Signing and Encryption Keys in AAD B2C
A JWT Token Issuer requires access to two cryptographic keys that must be stored alongside the policies within the AAD B2C instance. The first key is used to digitally sign the JWT tokens that are issued when the policies are run. The second key is used to encrypt any refresh tokens that are issued when the policies are run.
Open your AAD B2C tenant settings page in the Azure Portal and click Identity Experience Framework in the AAD B2C menu on the left. Click Policy Keys, and then click +Add.
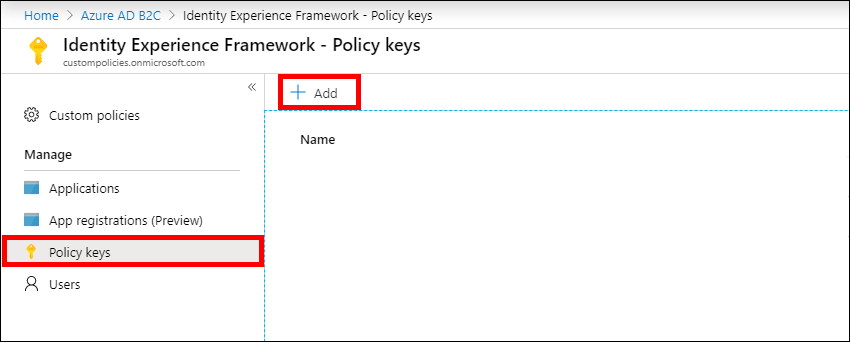
Add a policy key
In the Create a key dialog, set the values below and then click Create:
- Set Options to Generate
- Set Name to TokenSigningKeyContainer
- Set Key type to RSA
- Set Key usage to Signature
Click +Add again, and in the Create a key dialog, set the values below and then click Create:
- Set Options to Generate
- Set Name to TokenEncryptionKeyContainer
- Set Key type to RSA
- Set Key usage to Encryption
Notice that when you create the Cryptographic Key entry, the prefix B2C_1A_ will automatically be prepended to the key name, just as it was for your policy ID when you uploaded it.
NOTE
The names for the cryptographic keys above are merely convention – you can use your own names, but you need to be sure all of the references to them in your custom profiles are set to the correct names. Furthermore, you are not required to have AAD B2C generate the keys on your behalf. You can elect to manually enter the appropriate key secret or you can upload your own password-protected JWK file.
Declaring the JWT Token Issuer
Add the following ClaimsProvider element into the ClaimsProviders element that the policy already contains. If you used different names for the Cryptographic Keys that were created in the previous step, be sure to update the StorageReferenceId values to match the names that you used.
<ClaimsProvider>
  <!--
  The technical profile(s) defined in this section specify Token Issuers that are used by the required SendClaims step of a User Journey
  to return a token to the caller.
  -->
  <DisplayName>Token Issuer Technical Profiles</DisplayName>
  <TechnicalProfiles>
    <TechnicalProfile Id="JwtIssuer">
      <DisplayName>JWT Issuer</DisplayName>
      <Protocol Name="None" />
      <OutputTokenFormat>JWT</OutputTokenFormat>
      <Metadata>
        <Item Key="client_id">{service:te}</Item>
        <Item Key="issuer_refresh_token_user_identity_claim_type">objectId</Item>
        <Item Key="SendTokenResponseBodyWithJsonNumbers">true</Item>
      </Metadata>
      <CryptographicKeys>
        <Key Id="issuer_secret" StorageReferenceId="B2C_1A_TokenSigningKeyContainer" />
        <Key Id="issuer_refresh_token_key" StorageReferenceId="B2C_1A_TokenEncryptionKeyContainer" />
      </CryptographicKeys>
      <InputClaims />
      <OutputClaims />
    </TechnicalProfile>
  </TechnicalProfiles>
</ClaimsProvider>
NOTE
A newClaimsProviderelement is being used to group this Technical Profile separately from the Technical Profile that has already included in the policy. This is being done to help keep things organized, especially in later posts in this series where the policy content will become more complex.
For now, do not worry about the details of the JWT Token Issuer Technical Profile. The next post in this series will explore Technical Profiles and their content in detail.
Using the Token Issuer
Just declaring the JWT Token Issuer does not result in it being used by your policy. You have to include it as part of a User Journey.
Add the following UserJourneys element to the policy after the ClaimsProviders element that it already contains:
<UserJourneys>
  <UserJourney Id="HelloWorldJourney">
    <OrchestrationStep Order="1" Type="SendClaims" CpimIssuerTechnicalProfileReferenceId="JwtIssuer" />
  </UserJourney>
</UserJourneys>
User Journeys specify the steps that a policy will follow when it is called. In this case, the User Journey has been given the ID HelloWorldJourney, which will be used to reference it later in the policy. It also includes a single step with a type of SendClaims and a reference to the ID of the JWT Token Issuer (JwtIssuer) that you defined previously.
As was the case with Technical Profiles, do not worry too much about the details of User Journeys here. The next post in this series will also explain them further.
Defining the Policy’s Entry Point
We’re entering the home stretch. The Relying Party section is the final section that needs to be configured in the policy. The Relying Party section of a policy has two key responsibilities – it must specify which User Journey to execute and it must indicate which claims to include in the token that is returned when the policy is run.
Add the following RelyingParty element to the policy after the UserJourneys element that you just added:
<RelyingParty>
  <DefaultUserJourney ReferenceId="HelloWorldJourney"/>
  <TechnicalProfile Id="HelloWorldPolicyProfile">
    <DisplayName>Hello World Policy Profile</DisplayName>
    <Protocol Name="OpenIdConnect" />
    <OutputClaims>
      <OutputClaim ClaimTypeReferenceId="objectId" PartnerClaimType="sub" DefaultValue="Hello World Object ID"/>
      <OutputClaim ClaimTypeReferenceId="message" DefaultValue="Hello World!"/>
    </OutputClaims>
    <SubjectNamingInfo ClaimType="sub" />
  </TechnicalProfile>
</RelyingParty>
The RelyingParty element includes a DefaultUserJourney element that references the HelloWorldJourney User Journey that you created earlier. When this policy is run, the Relying Party will cause that User Journey to be invoked.
The TechnicalProfile element that is inside of the RelyingParty element has a few important declarations. It specifies the OpenIdConnect protocol is to be used for exchanges with this policy. It also includes two output claims that will be added to the JWT token that is being produced by the policy – our objectId and message claims. The values of these claims are set with the DefaultValue attributes, which will provide a value for a claim if it has not been previously set.
Note that the objectId claim includes an extra attribute. The PartnerClaimType attribute is used to provide a different external name for the claim than what has been used internally in the policy. In this case, the claim name that will be emitted in the token is sub instead of objectId.
NOTE
As was previously mentioned, OpenID Connect requires identifying the subject for whom a token is issued. Thesubclaim is defined in the OpenID Connect specification as the required name for the subject identifier claim. Since it is useful to use the nameobjectIdin other AAD B2C policy operations, it is convenient to just provide an alias when it is emitted in the token by using thePartnerClaimTypeattribute.
The last element worth mentioning is the SubjectNamingInfo element, which identifies the token subject and needs to reference the subject claim as it is being output (the PartnerClaimType value.)
The Final Product
If you’ve been able to follow along so far, your policy file should match the following XML, with your own tenant and policy ID names in the TrustFrameworkPolicy element and (if you used different names) your own cryptographic key names in the JWTIssuer TechnicalProfile element:
<?xml version="1.0" encoding="UTF-8" standalone="yes"?>
<TrustFrameworkPolicy
  xmlns_xsi="http://www.w3.org/2001/XMLSchema-instance"
  xmlns_xsd="http://www.w3.org/2001/XMLSchema"

  PolicySchemaVersion="0.3.0.0"
  TenantId="YOUR_TENANT_NAME.onmicrosoft.com"
  PolicyId="YOUR_POLICY_ID"
  PublicPolicyUri="http://YOUR_TENANT_NAME.onmicrosoft.com/YOUR_POLICY_ID">

  <BuildingBlocks>
    <ClaimsSchema>
      <ClaimType Id="objectId">
        <DataType>string</DataType>
      </ClaimType>

      <ClaimType Id="message">
        <DataType>string</DataType>
      </ClaimType>
    </ClaimsSchema>
  </BuildingBlocks>

  <ClaimsProviders>
    <ClaimsProvider>
      <!-- The technical profile(s) defined in this section is required by the framework to be included in all policies. -->
      <DisplayName>Trustframework Policy Engine TechnicalProfiles</DisplayName>
      <TechnicalProfiles>
        <TechnicalProfile Id="TpEngine_c3bd4fe2-1775-4013-b91d-35f16d377d13">
          <DisplayName>Trustframework Policy Engine Default Technical Profile</DisplayName>
          <Protocol Name="None" />
          <Metadata>
            <Item Key="url">{service:te}</Item>
          </Metadata>
        </TechnicalProfile>
      </TechnicalProfiles>
    </ClaimsProvider>

    <ClaimsProvider>
      <!--
      The technical profile(s) defined in this section specify Token Issuers that are used by the required SendClaims step of a User Journey
      to return a token to the caller.
      -->
      <DisplayName>Token Issuer Technical Profiles</DisplayName>
      <TechnicalProfiles>
        <TechnicalProfile Id="JwtIssuer">
          <DisplayName>JWT Issuer</DisplayName>
          <Protocol Name="None" />
          <OutputTokenFormat>JWT</OutputTokenFormat>
          <Metadata>
            <Item Key="client_id">{service:te}</Item>
            <Item Key="issuer_refresh_token_user_identity_claim_type">objectId</Item>
            <Item Key="SendTokenResponseBodyWithJsonNumbers">true</Item>
          </Metadata>
          <CryptographicKeys>
            <Key Id="issuer_secret" StorageReferenceId="B2C_1A_TokenSigningKeyContainer" />
            <Key Id="issuer_refresh_token_key" StorageReferenceId="B2C_1A_TokenEncryptionKeyContainer" />
          </CryptographicKeys>
          <InputClaims />
          <OutputClaims />
        </TechnicalProfile>
      </TechnicalProfiles>
    </ClaimsProvider>
  </ClaimsProviders>

  <UserJourneys>
    <UserJourney Id="HelloWorldJourney">
      <OrchestrationSteps>
        <OrchestrationStep Order="1" Type="SendClaims" CpimIssuerTechnicalProfileReferenceId="JwtIssuer" />
      </OrchestrationSteps>
    </UserJourney>
  </UserJourneys>

  <RelyingParty>
    <DefaultUserJourney ReferenceId="HelloWorldJourney"/>
    <TechnicalProfile Id="HelloWorldPolicyProfile">
      <DisplayName>Hello World Policy Profile</DisplayName>
      <Protocol Name="OpenIdConnect" />
      <OutputClaims>
        <OutputClaim ClaimTypeReferenceId="objectId" PartnerClaimType="sub" DefaultValue="Hello World Object ID"/>
        <OutputClaim ClaimTypeReferenceId="message" DefaultValue="Hello World!"/>
      </OutputClaims>
      <SubjectNamingInfo ClaimType="sub" />
    </TechnicalProfile>
  </RelyingParty>
</TrustFrameworkPolicy>
Alternatively, you can download a copy of the policy file here.
Let’s Try It Out
It’s time to upload the updated policy file. If you followed through the previous post in this series, you will already have a policy called B2C_1A_Example listed. If you simply try to upload the updated policy, you will receive an error message telling you that your tenant already has a policy with the given ID. To fix this, check the box next to Overwrite the custom policy if it already exists in the Upload custom policy dialog.
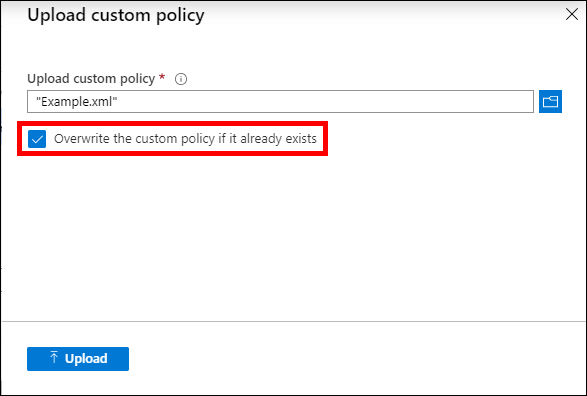
Overwrite the custom policy if it already exists
Once the policy has been uploaded, click on the policy ID. Notice that the portal now displays a different panel for the policy than it did when you clicked the policy ID in the previous post in this series. However, we still cannot do much with this panel. To use this panel to run the policy, we first need to register an application in the AAD B2C tenant.
Registering the jwt.ms Application
Since the outcome of running these OpenID Connect custom policies is a JWT token, it is quite useful to be able to examine the contents of the resulting token without necessarily building application code to do so. This helps the process of developing and testing the policy execution in isolation. There are in fact several sites available on the Web that allow you to decode and examine the contents of JWT tokens, including:
For the posts in this series, we will be using the https://jwt.ms site. This is because jwt.ms is more contextually aware of AAD B2C then other tools, and the documentation that it produces to describe claims and other aspects of the tokens that it receives is a little more useful.
In the portal, click the App registrations (preview). Click +New registration from the top of the App registrations display to bring up the Register an application page. Enter the following setting for the application:
- Set Name to Token Viewer.
- Set Supported account types to Accounts in any organizational directory or any identity provider. (Note the instruction that this option is required for AAD B2C.)
- Under Redirect URI, choose Web and enter https://jwt.ms beside the web selection.
- Under Permissions, make sure that Grant admin consent to openid and offline_access permissions is checked. (Note the instruction here indicating this setting is required for AAD B2C.)
- Click Register
Once the application has been registered, you must update it to include support for implicit grant flow authentication. In the portal page for the newly registered application, click Authentication from the menu on the left (it is in the Manage section.) Under Implicit grant, check both Access tokens and ID tokens. Then click Save.
NOTE
At the time of this writing, there are two application registration and management tools available in AAD B2C. There is an ongoing effort to unify the application management functionality options available in Azure Active Directory and AAD B2C tenants. The original AAD B2C tool is available in the Applications menu item while the new experience is in preview. For the posts in this series, we use the preview experience, since it will eventually replace the original one.
Running the Policy
Return to the Identity Experience Framework page and once again click on the policy ID. The panel displayed by the portal is now a bit more complete and is now ready to be used to run the policy.
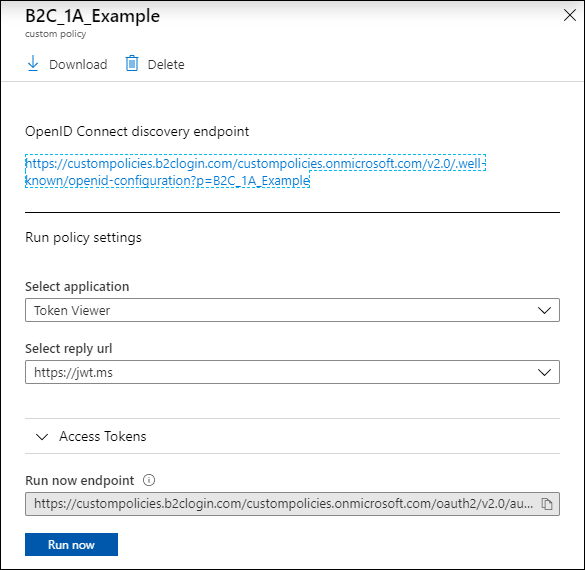
The policy panel
Click Run Now to run the policy. Your browser should display a new page opened to the jwt.ms site, and you should see the information from the JWT token produced by the policy in the Decoded Token tab, as shown below. (Note – you can click the Claims tab to get a detailed explanation of the other claims in the token.)
{
  "typ": "JWT",
  ...
}.{
  ...
  "sub": "Hello World Object ID",
  ...
  "message": "Hello World!"
}.[Signature]

//(Content trimmed for brevity)
And there it is – the Hello World! greeting we have been waiting to see!
Displaying hardcoded, static text is perhaps a bit boring. We can do better. We also have yet to dive into the syntax of the XML policy files. In the next section of this series we will examine the policy file syntax to better understand what we have done so far. We will also be updating our policy to let the user participate in determining the greeting message by collecting data with some user interface elements.
You can read part 3 of my series here.