With software development, there’s almost always multiple ways to do things, and sometimes the best solution for a problem is not a technical one, rather a nontechnical one. With DevOps, this is certainly true, as there are increasingly multiple ways to do things to get code from a development environment into a code repo, built, then deployed. The do-it-all tool on Azure for this is Azure DevOps, which is a fantastic tool for building out pipelines of all sorts. However, sometimes having a lighter weight option might be building out.
Azure out of the box provides numerous ways to automate tasks on Azure that don’t require Azure DevOps and with containers, this is no different. The lynch pin in any DevOps pipeline for containers though is the container registry. It’s where containers go once they are built so they can be deployed into an environment for whatever task they may be used for.
Azure Container Registry (ACR) is Microsoft’s first party solution for container-based applications. ACR also provides some functionality to automate builds and deployments through tasks and web hooks respectively. To set this up is quite simple.
-
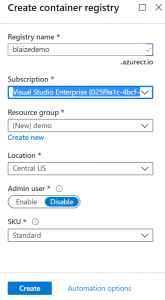
- Create an instance of Azure Container Registry. This is easy to do in the portal by selecting the Add Resource, then select Containers -> Container Registry
- The form for creating a container registry is straight forward. Simply give it a Name and the Portal will make sure that your name is unique, and then select or create a subscription, select or create a Resource Group, Location, and leave Admin user off and the SKU on Standard.
- Once the registry is created, the next thing to do is set up a GitHub repo or use an existing one. If you need help setting up a GitHub repo, check out this tutorial here. Make sure that whatever repo you are using has a Dockerfile in the root of the repository.
- The next step is to generate a Personal Access Token for GitHub. ACR uses this to watch for changes to a repository. This is easy to do on GitHub through the settings menu. Make sure that you copy and paste the token into a text editor so you can have it for the next step.
- Once the token is created, you can now create an ACR task using the Azure. You can easily do this with the Azure CLI or simply use the Azure CLI in CloudShell in the portal. The command az acr task create is needed to create the task. The parameters needed are-t the image repo and tag you want to create. The image’s full image will be your container reigstry’s name plus azurecr.io/repo:tag For example, I am calling my image “my-app”, so it will deploy to blaizedemo.azurecr.io/my-app:latest for the image.-n the name of the task. This is simply to identify the ACR task on Azure.-r the name of the Azure Container Registry you want to use.-c the URL for your GitHub repository plus any folder or branch information you want to include.-f the relative path to the Dockerfile you want to build against.–git-access-token the GitHub Personal Access Token you created.A full command will look something like this:
az acr task create -t my-app -n my-app -r blaizedemo -c https://github.com/theonemule/acr-demo.git -f Dockerfile --git-access-token 7be...32b
With the task created, container builds are automated whenever code in checked into the repository. You can set up builds against specific branches or folders in the repository too. Commit a change to your GitHub repo to trigger the ACR task.
One of the easiest ways to do this on Azure is through Azure Automation, which allows you to run scripts within the context of Azure that can do things like create VM’s, shutdown web apps, or trigger a restart on an Azure Container Instance. For this, we are going to use Azure Automation
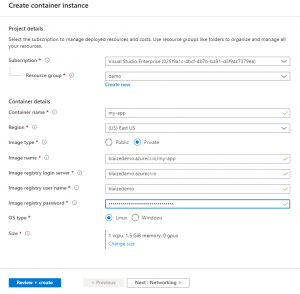
- To make this work, you’ll also need an Azure Container Instance (ACI). First though, create or configure Azure Container Instances to work with your image. You can add Azure Container Instance through the portal by selected Containers -> Container Instances or searching for it in the Marketplace. Once have it, configure the container instance to use your image. You will need to get a password for your ACR instance because the image will be in a private registry. You can do this by going to your ACR instance, selecting Access Keys, then enabling the Admin user. It will generate some passwords. Copy one of these into the form for creating the ACI instance. The image’s full image will be your container reigstry’s name plus azurecr.io/repo:tag For example, I am calling my image “my-app”, so it will deploy to blaizedemo.azurecr.io/my-app:latest for the image. Deploy the ACI instance and it will pull the image you built in step 5.
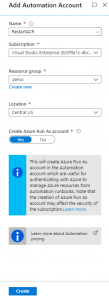
- Create an Automation Account in the Portal by searching for Azure Automation in the Azure Marketplace. On the form for Azure Automation, give it a Name and place it in the same or different Resource Group, but keep it within the same Subscription as the ACR instance to simplify authorization and authentication for the account. The Location is less important, but for speed keeping it local to the container registry helps. Create the Automation account and wait for it to provision.
- Once the resource deploys, navigate to the Automation Account in the resource group, and navigate to Runbooks, then click on Create a runbook. Name it “RestartACI” or something else, make sure the book type is “PowerShell”, and give it a description like “Restart an Azure Container Instance”.

- In the code editor, paste in the following code. Change the ResourceGroupName parameter on the last line to match your resource group and the name of the ResourceName parameter to the name of your ACR instance that you created. Save the runbook, then Publish the runbook.
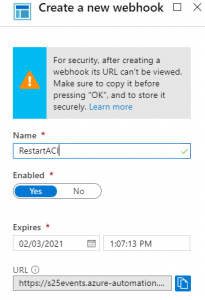
$connectionName = "AzureRunAsConnection" try { # Get the connection "AzureRunAsConnection " $servicePrincipalConnection=Get-AutomationConnection -Name $connectionName "Logging in to Azure..." Add-AzureRmAccount ` -ServicePrincipal ` -TenantId $servicePrincipalConnection.TenantId ` -ApplicationId $servicePrincipalConnection.ApplicationId ` -CertificateThumbprint $servicePrincipalConnection.CertificateThumbprint } catch { if (!$servicePrincipalConnection) { $ErrorMessage = "Connection $connectionName not found." throw $ErrorMessage } else{ Write-Error -Message $_.Exception throw $_.Exception } } Invoke-AzureRmResourceAction -ResourceGroupName demo -ResourceName my-app -Action Restart -ResourceType Microsoft.ContainerInstance/containerGroups https://s25events.azure-automation.net/webhooks?token=6HY7L0bUG7j2u5fKb4bh0AIiTGD8AZ9Ny2KijNubz%2bQ%3d - After you save the Runbook, select Webhooks on the left, then click Create webhook, then Create new webook. Name it RestartACI, and give it some arbitrary date in the distant future for the Expires field. Copy the generated URL, then click OK. This will close the blade, then click on Create.
New Webhook - Back in the ACR instance, locate Webhooks, click on Add, then paste in the URL you copied from the Automation Account Webhook into the Service URI and Name it RestartACI, then click Create.
Now, commit some changes to the GitHub repo, and the ACR Task that builds the image will also trigger ACI to restart, which will in turn pull the newly created image that the ACR task built. Now you have a full pipeline to build and deploy a container image on Azure!